
When I first saw Softube’s Flow controller, I thought it was going to be a transport and master control unit, something like the SSL UF1. Honestly, I was pumped. Then I saw the name and realized it’s tied to Softube’s Flow Mixing and Mastering suites, and I was a little let down.
I also assumed it was purely a producer’s tool, and that as a mixing and mastering engineer it wouldn’t have much to offer me. I was wrong about that too. The more I’ve used it, the more that first impression has gone away. There’s a lot going on under the hood of this little box.
Quick Verdict: Is the Softube Flow Controller Worth It?
- What surprised me: Building my own flows. Mapping just the controls I care about on a drum bus or reverb return is genuinely useful when mixing.
- Best everyday feature: DAW mode. Volume, pan and six sends for whatever track you’re on, right next to your mouse.
- Biggest limitations: No programmable buttons in DAW mode, and no third-party plugin support. You’re locked into Softube’s ecosystem.
- Who it’s for: Producers, beat makers and mixing engineers, especially if you’re already using Softube’s Console 1.
How the Flow Controller Works: Three Modes
The way I see it, there are three sections to this thing:
- Flow mode: The selling point. Big macro moves across a whole chain of plugins.
- Detail mode: Finer control over each plugin inside a flow.
- DAW mode: Volume, pan and sends for the track you’re on.
Flow Mode
You load a flow either inside the plugin or from the Flow button on the hardware. You can filter by instrument, so if you’re working on a drum bus, filter by drums and pick something like the Modern Drum Bus flow. A chain of plugins loads up, along with a set of macro knobs.
Those macro knobs are the same as the knobs on the controller. Turn up Tone and you’ll see the Tube-Tech EQ start moving frequencies that Softube has already linked together for that flow. Turn Dynamics and the compressor’s knobs move.
The real magic is the big Flow knob. Turning it moves dynamics, tone, tape and width up or down at the same time. On the drum bus flow you also get space and parallel compression. The more you turn it up, the more of the flow you hear. If part of it isn’t working, say it’s getting too compressed, you just turn that one macro down. So you can fine-tune as you go.
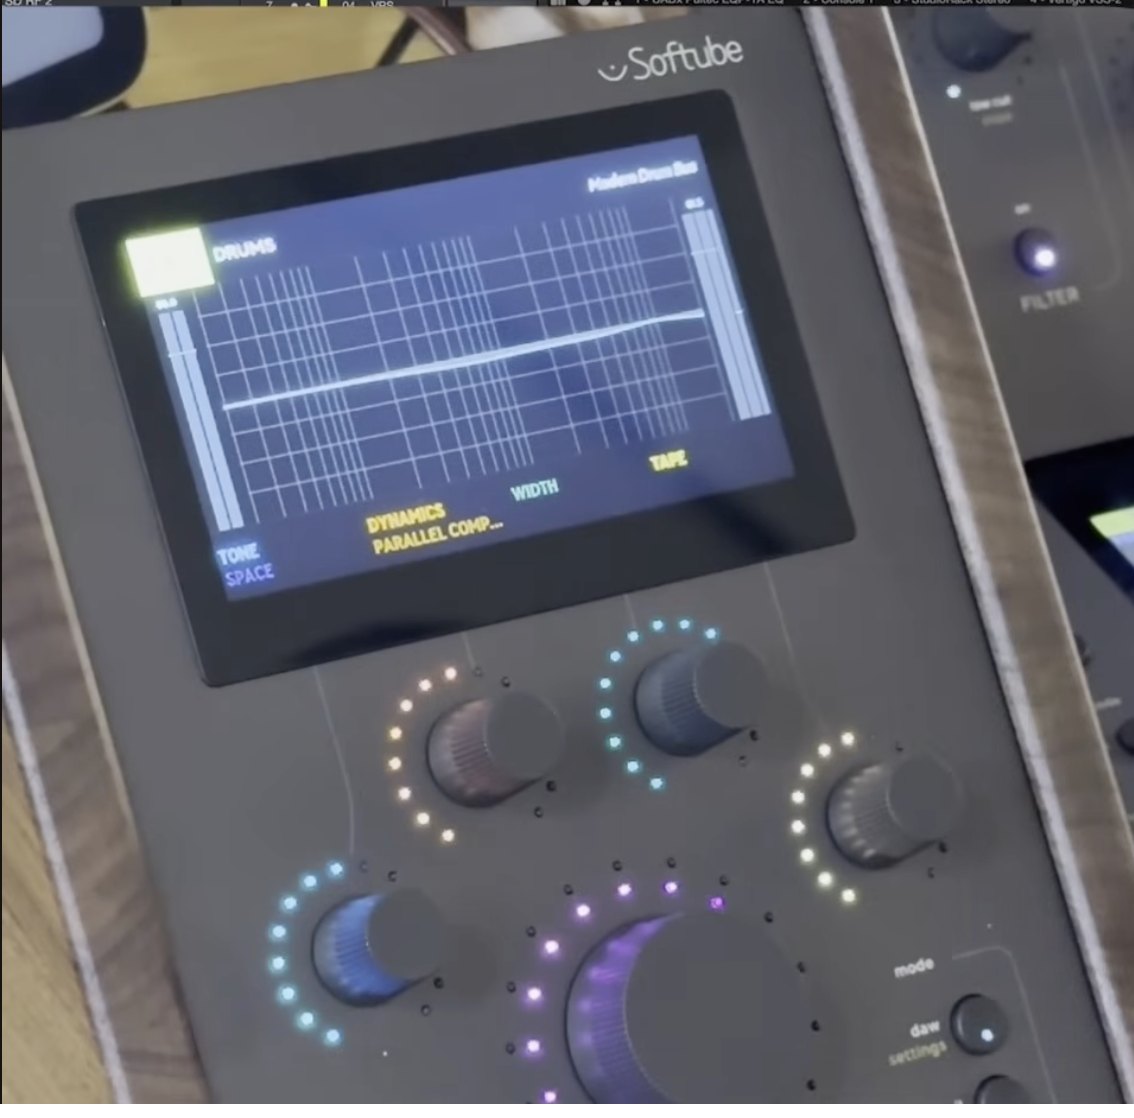
You can also bring up the on-screen display, the same one Console 1 uses. When you touch a knob, the plugin it controls lights up so you can see exactly what’s moving. Hit Shift to get to a second layer of controls, like the parallel compressor.
Detail Mode
Hit Detail and you get finer control of each individual plugin in the flow. On the bus compressor, for example, the knobs now control just the threshold, just the ratio, just the attack, rather than everything at once. (The release knob didn’t do anything in my session because the release is tempo-synced to the DAW. Shift gets you to the synced release and makeup gain.)
So there are a couple of ways to work. In what I’d call producer or songwriter mode, you pull up a flow, turn the Flow knob until it sounds good, maybe tweak the tone, and you have a sound. Or you start there and then jump into Detail to tweak the compression more precisely.
DAW Mode
This is where it got interesting for me as a mixer. In DAW mode you get volume (which moves your fader), pan, and send control. Hit Shift and you can step through sends one through six.
If you’re already in the Console 1 ecosystem, it works on Console 1 tracks too, not just Flow tracks. Yes, it’s slightly redundant with what I already have. But even with all my controllers, my hand is on the mouse a lot. Having volume, pan and sends for whatever track I just clicked, right there next to the mouse, meant I wasn’t looking down to find the right fader or reaching across the desk for a panner. They’re small things, but they add up. With DAW mode and the Console 1 together, I found I was moving through a mix a lot more gracefully.
Free Download
Want a better starting point for your vocals?
Grab my free vocal preset and hear the difference on your next session.
Building Your Own Flows (The Mixer’s Feature)
Coming from mixing, where I want more control over my plugins, this is the part that got me excited. You can build your own flows and map only the controls you actually use.
Here’s a quick drum bus example:
- Start empty. Open the presets and choose Empty Signal Chain.
- Add a compressor. I used the Bus Processor. Nine times out of ten, if I have a compressor on my drum bus it’s a fast release, a pretty slow attack and around 2:1, just to glue things together a little. Once that’s set, the only thing I really need to turn is the threshold. Right-click the threshold and choose Map to Flow Control.
- Map saturation. A little saturation on the drum bus is common for me too. Right-click, map it, and you can even rename it. I changed “Sat Amount” to just “Saturation.”
- Add a clipper. If the drum bus is getting a little too pokey and pushing my limiter around, I’ll clip the peaks. Map the peak ceiling so it pulls the peaks down without really changing the volume.
Now I can hit the drum bus and dial it in fast, and the visualization on screen makes it easy to see what the compressor is doing.
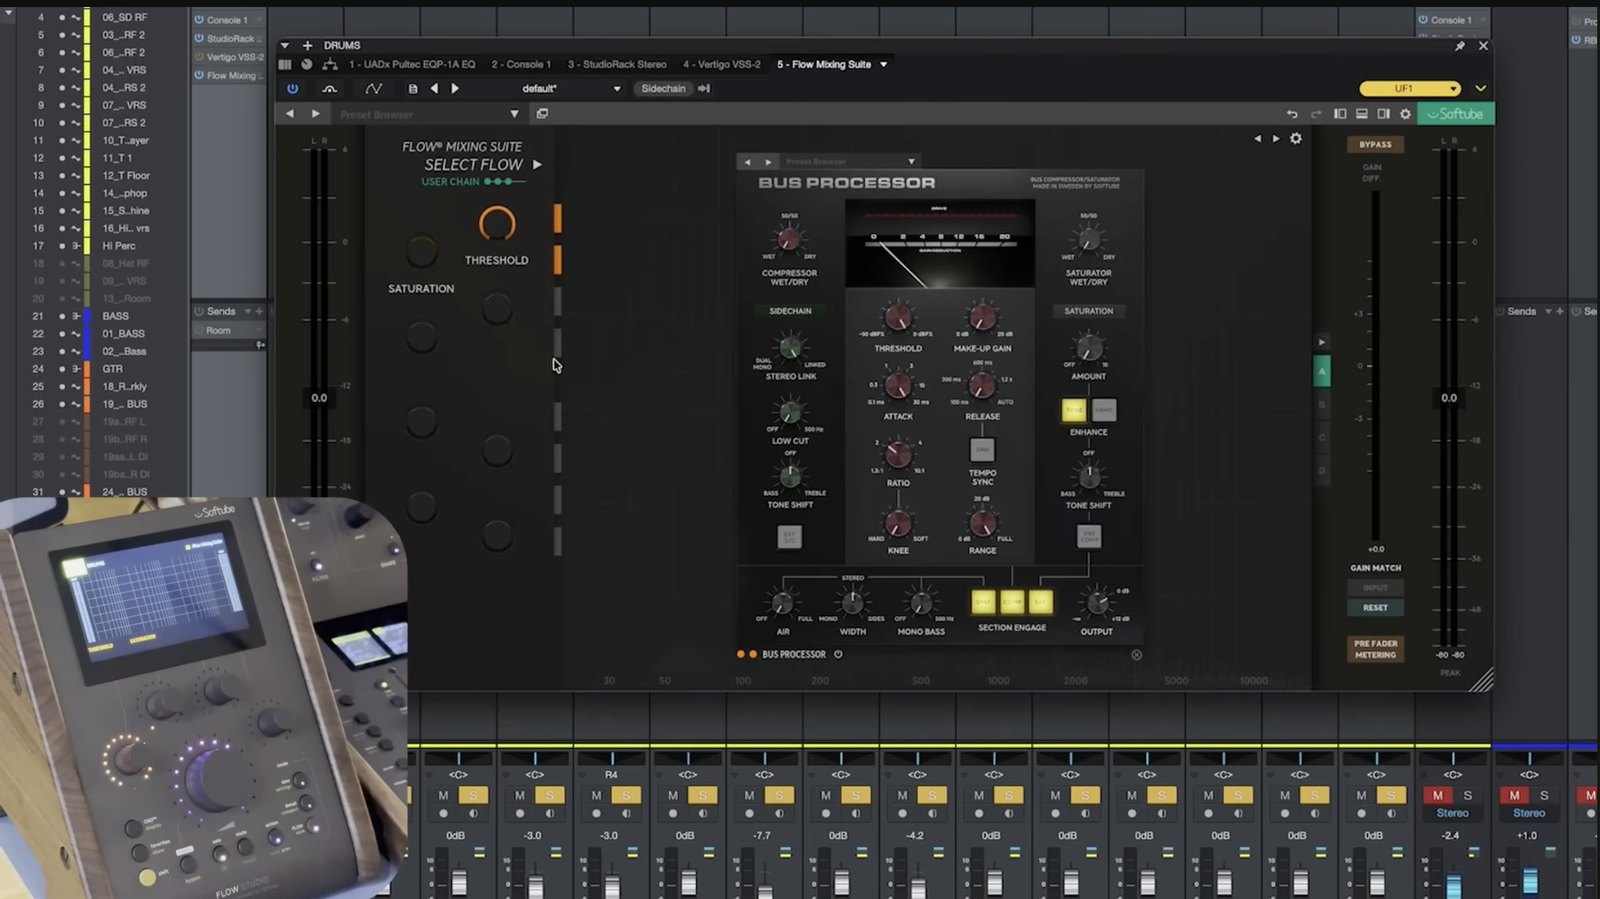
Could I just do this with regular plugins and a mouse? Sure, that’s a fair point. What I like is this: say I set the drum bus up as a flow, then go off and mix the bass. While the song is playing I can jump back to the drum bus, glance at it, notice the compressor is hitting harder now, pull it back, and go right back to what I was doing. It’s a quick way to keep an eye on your compression. It would work great on your mix bus too.
Using Flow on Reverb and Delay Returns
Another really useful place for it is on your returns. Load Flow Mixing on a reverb return and you’ll find presets built for sends. I loaded a dark plate on a vocal send and got quick controls for:
- Low cut and high cut (I use both all the time on the Console 1)
- Reverb time
- A de-esser built into the flow
- Pre-delay and shimmer on the Shift layer
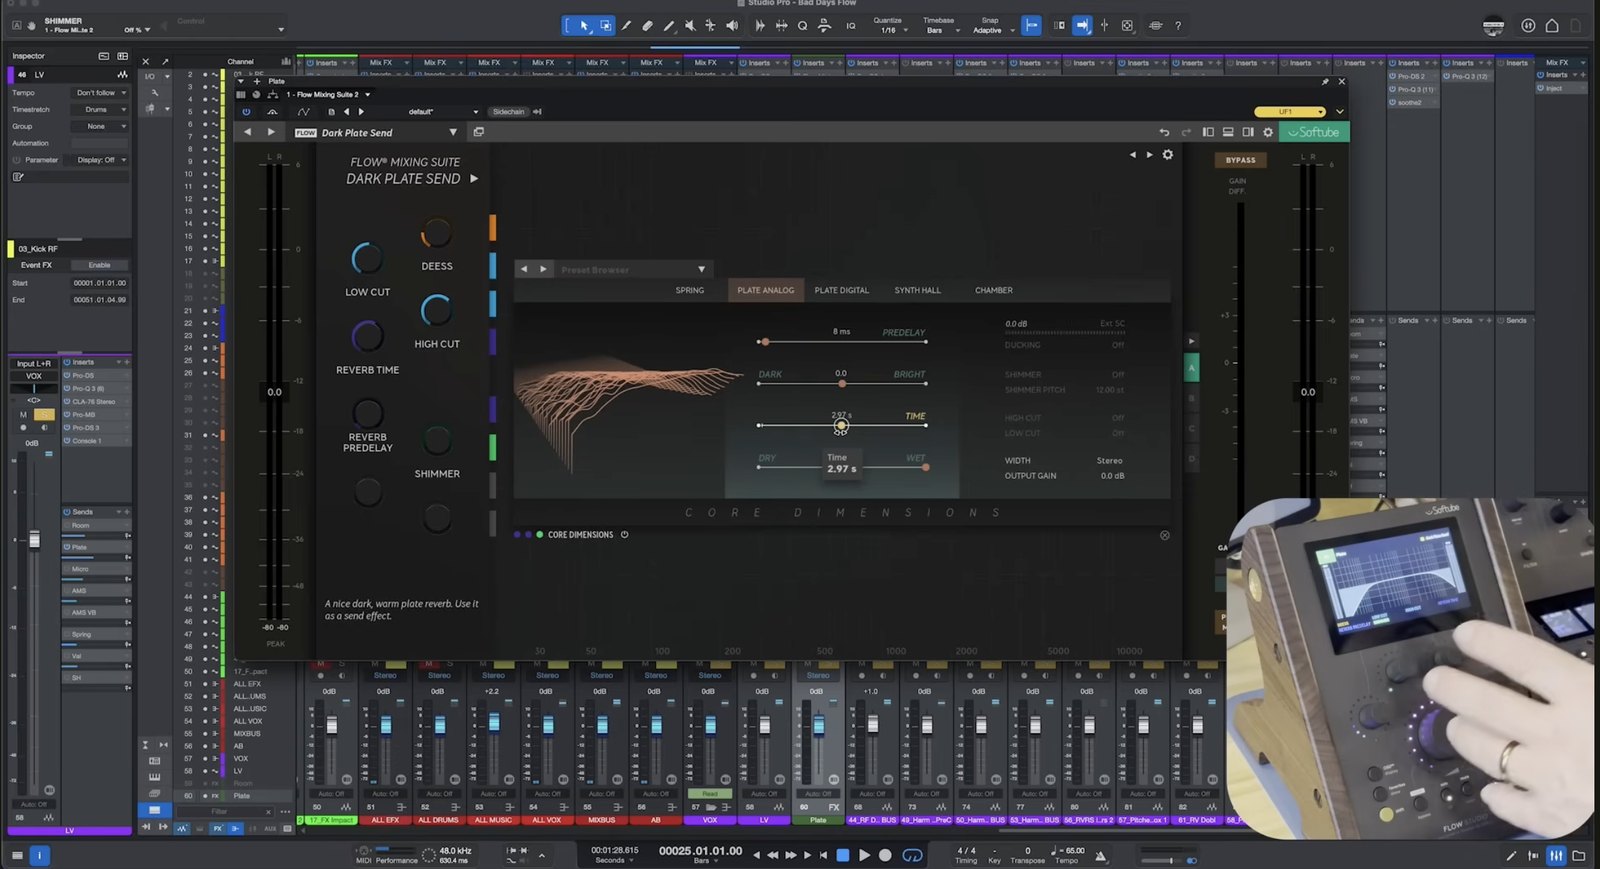
Changing reverb time from a knob just feels more intuitive and, honestly, more fun. And there’s a creative side: automate the reverb time or pre-delay, switch delays on and off, bring a flanger in and out. That works for producers and songwriters too. Instead of slapping on the same old plate preset, you might actually tweak the reverb time or high cut it, hear it right away, and find a sound you wouldn’t have found otherwise.
Flow Mastering
Flow Mastering is a separate subscription, and I know this all gets expensive. But it’s pretty cool, and I use it from time to time for a couple of specific plugins. (I went deeper on the software itself in my Flow Mastering Suite review.)
I built a very simple chain: a Chandler Curve Bender and a Weiss limiter. On my mix bus, if I need a little more top or a little more bottom while I’m mixing, I can grab it quickly, then push the limiter to get the mix a bit louder as I work. The final master is a separate thing, but for quick moves during the mix it’s great.
The built-in flows are there too. Pull up something like Modern Master and turning one knob changes compressor thresholds, a bus compressor and a “smiley face” EQ all at once. That’s three EQ moves in one knob.
Mixing & Mastering
Rather have a pro turn the knobs?
One engineer handles everything, start to finish. Credits include A$AP Rocky, Kelly Clarkson and Travis Barker.
What I Wish Softube Had Done Differently
Programmable Buttons in DAW Mode
People complain a lot about Softube controllers not having transport control. Honestly, I think that’s the smaller issue. We all have a spacebar. What I’d love is the ability to program the buttons myself in DAW mode: play, stop and, more importantly, automation. Automation control is something I miss on the Console 1 too. With that level of customization, this thing would be even more useful.
No Third-Party Plugin Support
Being locked into the Softube ecosystem is a real limitation. I’d love to run my other plugins with it. My guess is that’s coming. Softube has a track record of expanding what its hardware can do over time, and the Console 1 is proof of that.
Common Questions About the Softube Flow Controller
Is the Flow controller only for producers?
No. That’s what I assumed too. Custom flows on a drum bus or reverb return, plus DAW mode for volume, pan and sends, make it useful for mixing engineers as well.
Does it have transport controls?
Not as a dedicated transport section, and the buttons aren’t user-programmable in DAW mode. For play and stop you’ll still use your keyboard.
Does it work with third-party plugins?
Not when I made this review. It works with Softube’s Flow Mixing and Flow Mastering suites, and DAW mode also works on Console 1 tracks.
Does it work alongside Console 1?
Yes. I used them together, and DAW mode controls Console 1 tracks as well as Flow tracks.
Final Thoughts
I misjudged this thing. My complaints are real but minor on what’s generally a fun and versatile unit. Whether you’re a producer, a beat maker or a mixing and mastering engineer like me, there’s something here for you. If you’re comparing it to other options, I break down every controller I’ve owned in my mixing controller comparison.
Key Takeaways
- Flow has three modes: Flow, Detail and DAW
- The Flow knob moves a whole chain at once; Detail mode gives you each plugin individually
- Custom flows let you map only the controls you use, great for drum bus and mix bus
- It’s especially useful on reverb and delay returns
- Downsides: no programmable DAW-mode buttons and no third-party plugin support yet
What do you think of Flow? Let me know in the comments. And if you need your song mixed or mastered, hit me up here.