The Ultimate Auto-Tune Tutorial
Welcome to my guide on how to utilize Auto-Tune. As someone deeply experienced in the field of mixing and mastering I have honed my skills in using Auto Tunes settings and techniques. Through this tutorial, you’ll gain an understanding of how to elevate your music to new heights.
Auto-Tune is a game-changing technology that can help you achieve perfect pitch correction and add unique vocal effects to your music. Whether you’re a seasoned professional or just starting, this tutorial will walk you through the ins and outs of using Auto-Tune.
By employing the Auto Tune settings you can unlock your full potential and refine your sound. This tutorial covers everything from grasping the fundamentals of Auto-Tune to exploring techniques and addressing common troubleshooting issues.
So, let’s get started and explore the world of Auto-Tune settings together!
Understanding Auto-Tune
Before we dive into the settings, let’s first understand what Auto-Tune is and how it works. Auto-Tune is a pitch correction software that corrects out-of-tune vocals in real time. It was first developed by Antares Audio Technologies in 1997 and has since become an essential tool in the music industry. Auto-Tune works by detecting the pitch of the incoming audio and correcting it to the nearest note in the chosen scale.
The software uses a time correction algorithm to adjust the pitch, making it sound more natural. The result is a polished, professional sound that would be difficult to achieve manually.
Auto-Tune is used not only for pitch correction but also for creating unique vocal effects. By manipulating the settings, you can achieve robotic or otherworldly-sounding vocals. Now that we have a basic understanding of Auto-Tune let’s explore the different settings and how to use them.
The Auto-Tune Interface
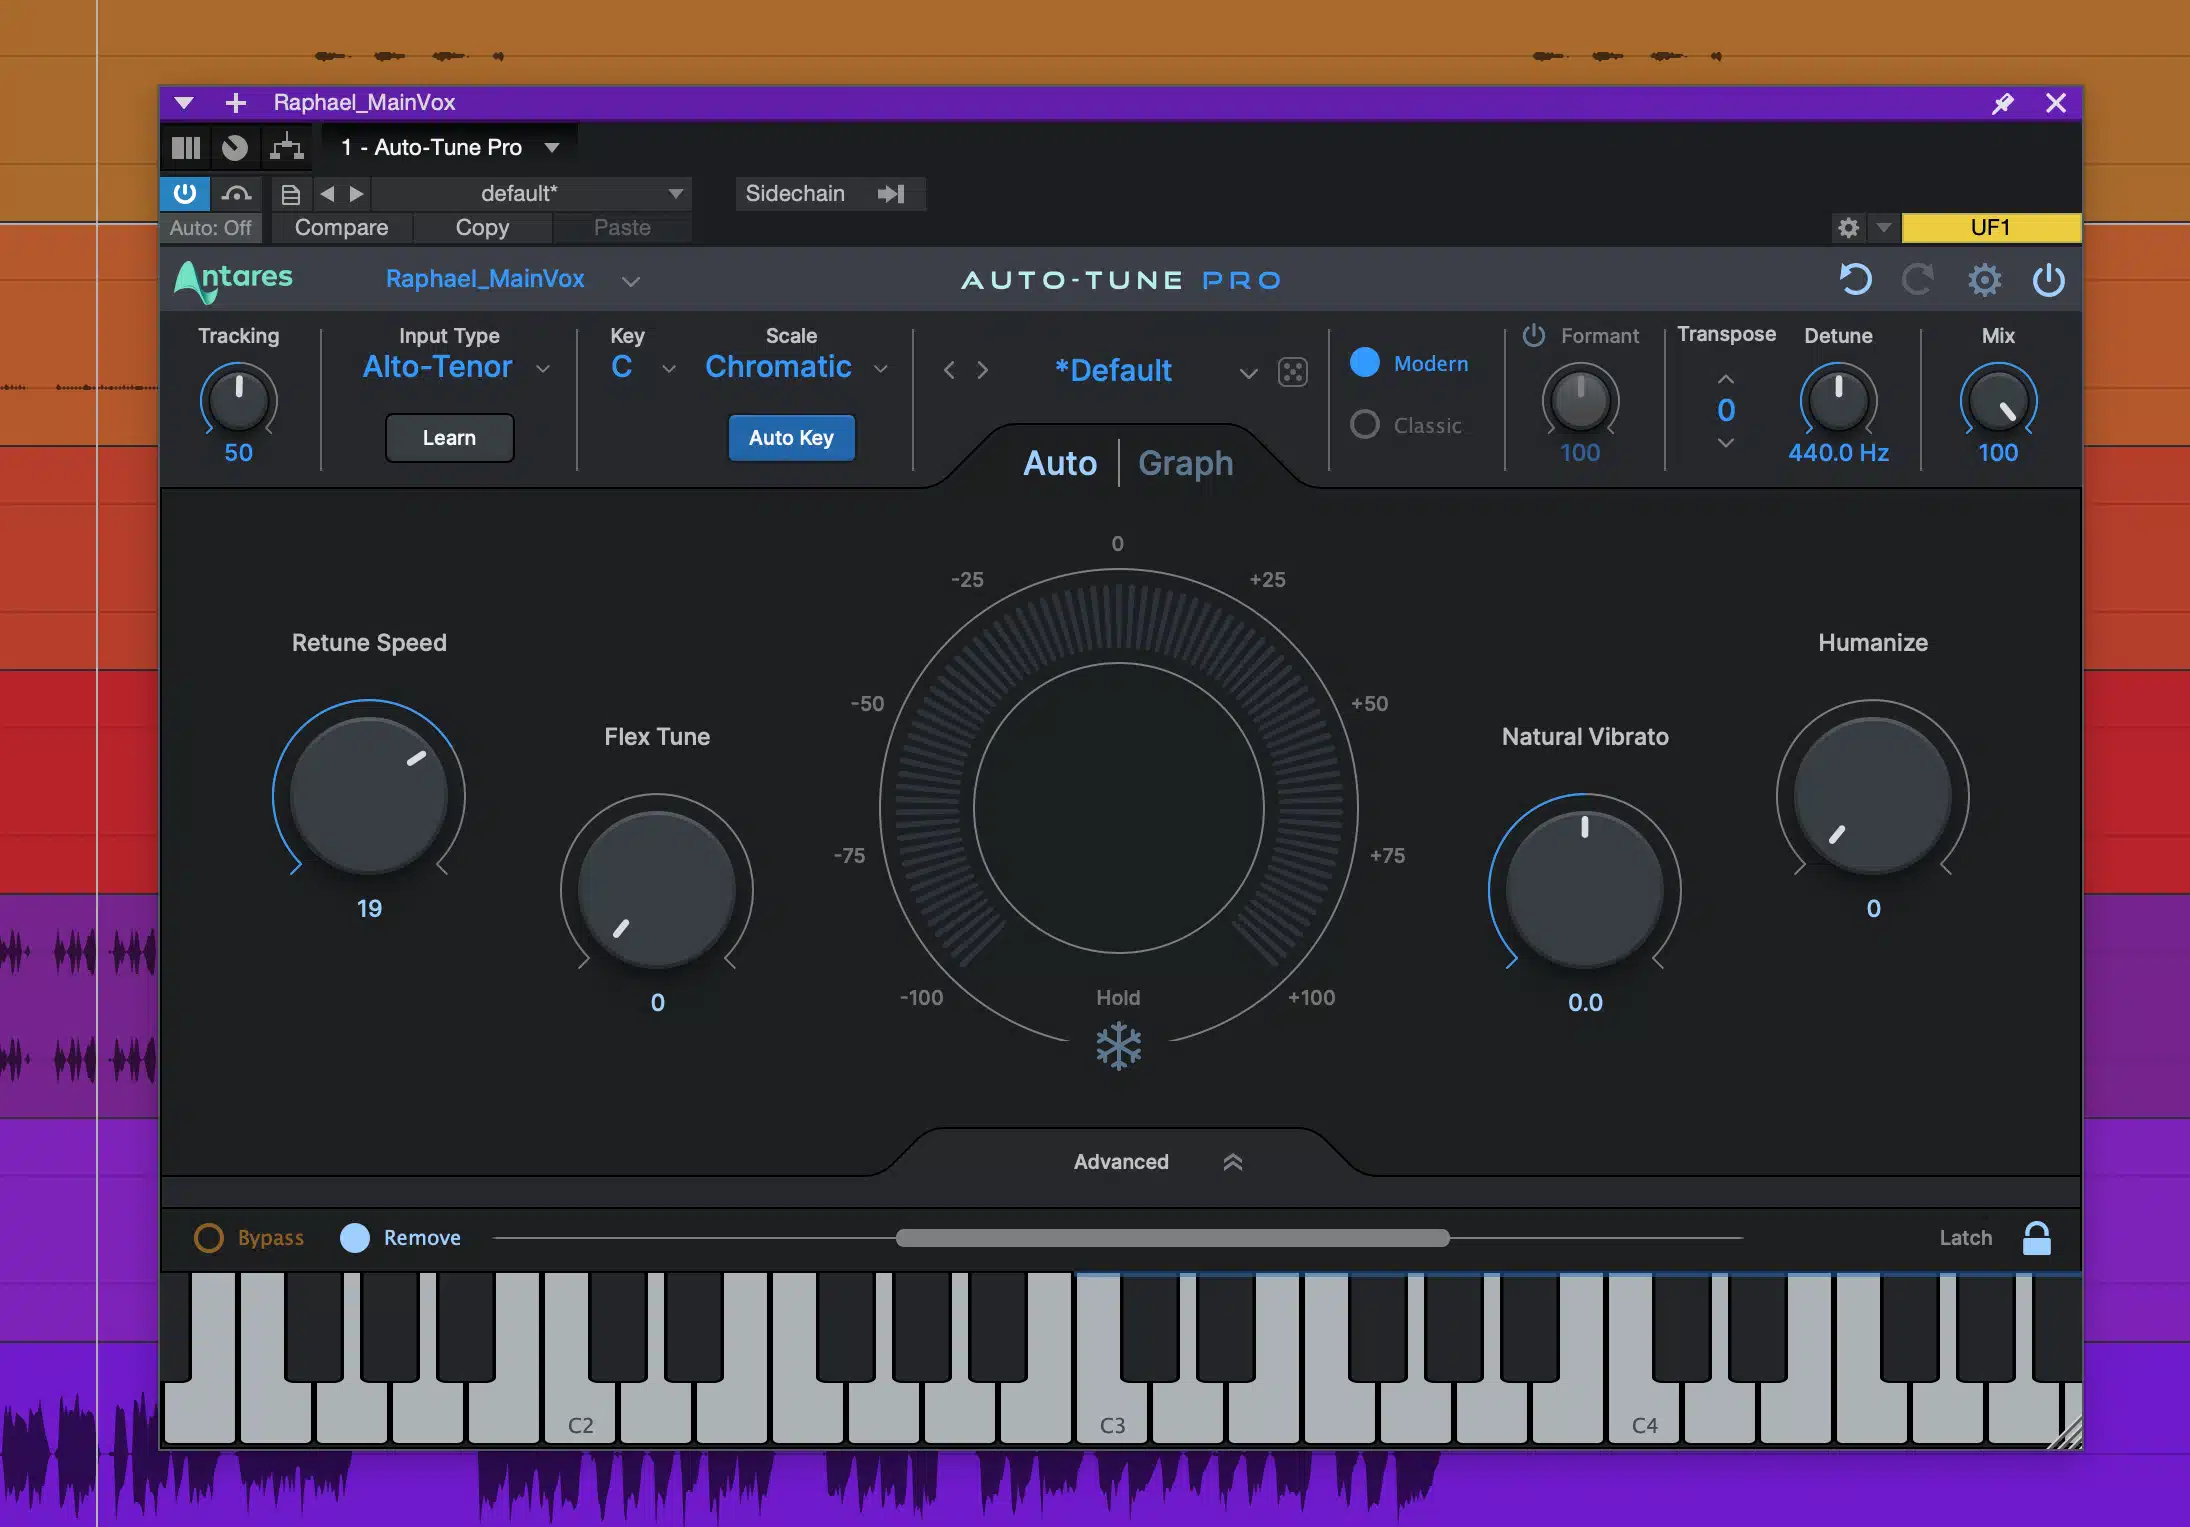
The Auto-Tune interface can look intimidating at first glance but don’t worry, it’s easy to understand. The software consists of several parameters that you can adjust to achieve the desired effect. Let’s take a closer look at some of the key parameters:
- Retune Speed: This controls the speed at which the pitch is corrected. A faster speed creates a more robotic sound, whereas a slower speed sounds more natural.
- Scale: This determines the musical scale that the pitch correction is based on. You can choose from a variety of scales to achieve the desired effect.
- Formant: This parameter controls the vocal characteristics of the sound. By adjusting the formant, you can create unique vocal effects.
- Humanize: This parameter adds slight variations to the pitch correction, making it sound more natural and less robotic.
These are just a few of the parameters available in Auto-Tune. Don’t worry if it seems overwhelming at first; we’ll cover each parameter in detail in the following sections. Let’s move on to section 3 and discuss how to choose the right version of Auto-Tune for your needs.
Choosing the Right Auto-Tune Version
The most basic version of, Auto-Tune Access, provides the essential features of pitch correction and retune speed control. It’s an excellent choice for beginners or artists who are looking for a simple solution. However, it lacks the advanced features of other versions.
The standard version, Auto-Tune Pro, is the most popular and comprehensive one, offering a range of functionalities, including formant shifting and humanization. It’s ideal for professional producers and engineers looking for a complete package.
The Auto-Tune EFX+ version focuses on creative possibilities, with features such as Auto-Motion and Auto-EFX, allowing for unique vocal effects. It’s suitable for artists who want to add a creative touch to their sound.
One of the crucial features to consider when choosing the right Auto-Tune version is the auto-keyfeature. It allows for automatic detection of the key of a song, streamlining the pitch correction process. Auto-Key comes included in Auto-Tune Pro and EFX+ versions but not in Access.
Take the time to research and evaluate which Auto-Tune version suits your needs best. Consider the level of complexity you need, your budget, and the specific features that are essential to your music production. Choosing the right version will ensure that you have a solid foundation to start with when setting up Auto-Tune for recording.
Setting up Auto-Tune for Recording
Recording with Auto-Tune can be a smooth and effortless experience if you have the right settings in place. It is really important to record with auto-tune on if you are looking to get the T-Pain Effect. Let me guide you through the necessary steps to ensure optimal recording conditions:
Step 1: Determine the Key
Before recording, it’s essential to determine the key of the song. The key will inform the auto-tune settings you choose, and you can use a keyboard or pitch pipe to identify the key.
Step 2: Select the Correct Scale
Once you know the key, you must select the correct scale. Auto-Tune offers several options, and you’ll want to choose the one that matches the song’s key. This will ensure that the pitch correction is accurate.
Step 3: Set the Retune Speed
The retune speed controls how quickly Auto-Tune corrects pitch inaccuracies. A slower retune speed will result in a more natural-sounding correction, while a faster retune speed will create a more robotic effect. Experiment with different retune speeds to find the one that suits your needs best.
Step 4: Adjust the Humanize and Natural Vibrato Settings
Auto-Tune allows you to adjust humanize and natural vibrato settings to create a more authentic sound. The humanize setting will add subtle variations to the pitch correction, while the natural vibrato setting will maintain the natural vibrato of your voice.
Step 5: Record Multiple Takes
Finally, it’s always a good idea to record multiple takes with different settings. This will allow you to experiment and find the best auto-tune settings for your voice and song.
By following these steps, you’ll be able to set up Auto-Tune for recording efficiently. Don’t be afraid to experiment with different settings and take your time perfecting the process. Remember, the more you use Auto-Tune, the more comfortable and familiar you’ll become with the software.
Mastering Auto-Tune Settings
Now that you understand the basics of Auto-Tune, it’s time to dive into the settings. With the right adjustments, you can achieve anything from subtle pitch correction to creative and unique vocal effects. Here are some of the critical parameters to consider when mastering your Auto-Tune settings:
- Retune Speed: This setting controls how quickly Auto-Tune will correct your pitch. For a natural sound, set this to a slower speed, and increase it for a more robotic sound. Experiment with this setting to find the perfect balance for your music.
- Scale: Choose the key of your song here for accurate pitch correction. If you’re working with a beat that isn’t in a standard key, you can use the Auto-Key feature to detect the key automatically.
- Formant Control: This setting controls the timbre or tone of your voice. Increasing the formant knob can make your voice sound deeper, while decreasing it can make it sound higher-pitched.
- Vibrato: Set the amount and speed of vibrato, or the pitch fluctuations in your voice. This setting can be used to add character to your vocals or make them sound more natural.
It’s essential to listen carefully to the adjustments you make and ensure they complement the music. Here’s an example of adjusting the retune speed to create a distinctive effect:
| Retune Speed Setting | Effect |
|---|---|
| 0 | No pitch correction, all notes will be sung 100% naturally. |
| 1-6 | Subtle pitch correction. This is ideal for genres that require minimal pitch correction, such as country music. |
| 7-15 | Moderate pitch correction. This range is ideal for most genres, including pop, rock, and R&B. |
| 16-24 | Heavy pitch correction. This range is suitable for electronic music or any genre that requires a heavily processed vocal sound. |
Remember, the key is to experiment with different settings and find what works best for you and your music. Don’t be afraid to try something new and push the boundaries of what’s possible with Auto-Tune!
Advanced Techniques with Auto-Tune
Now that you have an understanding of the basics it’s time to delve deeper into some advanced techniques you can explore using Auto Tune. Lets discover ways to experiment with different settings and create unique vocal effects that will give your music its own character.
One technique you can use is to adjust the formant control to change the sound of your voice. The formant control alters the resonant frequencies of the vocals, allowing you to achieve a unique timbre and add more depth to your sound. Experimenting with this control can help you create distinctive vocal tones and textures.
You can also use auto-tune creatively by setting the retune speed to extreme levels. This will give your vocals an exaggerated effect and a robotic sound that can add a futuristic vibe. Keep in mind that this effect is best used sparingly to avoid overusing and becoming cliché.
Another technique is to use automation to create dynamic pitch effects. You can use automation to add subtle changes to specific words or phrases, giving your performance more emotion and depth. For example, you can gradually increase the pitch correction on a phrase to create a sense of building tension.
| Technique | Description |
|---|---|
| Formant Control | Adjusts the resonant frequencies of vocals to achieve unique timbre and add depth to your sound |
| Extreme Retune Speed | Creates an exaggerated and robotic effect for a futuristic vibe. Use sparingly to avoid being cliche. |
| Automation | Adds dynamic pitch effects to specific words or phrases, adding emotion and depth to your performance. |
Remember, the key to success with Auto-Tune is to experiment and trust your instincts. Don’t be afraid to try new things and take risks with your music. Take the time to refine your skills and find your unique sound by pushing the boundaries of what’s possible with auto-tune settings.
Troubleshooting Common Issues
While using Auto-Tune can take your music to new heights, it’s not always a smooth ride. Common issues can arise, but fear not, I’ll show you how to troubleshoot them.
Artifacts
Artifacts are unwanted sounds that occur when using Auto-Tune. They result from too much correction and can often sound robotic or unnatural. To fix artifacts, try reducing the retune speed or adjusting the formant control. If that doesn’t work, consider using a different version of Auto-Tune or blending it with manual pitch correction.
Unnatural Pitch Correction
Auto-Tune’s primary function is pitch correction, but sometimes it can sound too perfect, resulting in an unnatural sound. To fix this, try reducing the correction amount or experimenting with the humanize function to add subtle variations.
Excessive Robotic Effects
While a robotic effect can be desirable in certain genres, too much can be overwhelming and distracting. To fix this, experiment with the retune speed and formant control to create a less extreme effect. Additionally, try blending Auto-Tune with manual pitch correction for a more natural sound.
“Remember, the goal of Auto-Tune is to enhance your sound, not replace it entirely.”
When faced with these common issues, don’t be discouraged. Troubleshooting is an essential part of the process, and experimentation is key. Remember, the goal of Auto-Tune is to enhance your sound, not replace it entirely. With proper troubleshooting techniques and patience, you can achieve the perfect sound you’re looking for.
Blending Auto-Tune with Manual Pitch Correction
While Auto-Tune can help correct pitch, sometimes a combination of automated and manual pitch correction is needed to achieve a natural yet polished sound.
Here’s how:
1. Start by selecting the areas in your vocal track that need correction.
2. Use your DAW’s pitch correction tools to make manual adjustments while listening carefully to the pitch and tone.
3. Once you’ve made your manual corrections, apply Auto-Tune to the entire vocal track to give it a polished and professional sound.
Remember, while Auto-Tune can work wonders, it’s not a replacement for good vocal technique and practice. Always aim for the best possible performance, and use Auto-Tune to enhance your sound, not cover up mistakes.
Experiment with different combinations of manual and automated pitch correction to find the perfect balance for your vocals. Don’t be afraid to trust your ears and make bold choices to create a unique and authentic sound.
Automating Auto-Tune in Your Mix
Automation is a powerful tool for enhancing specific phrases or sections of your song. In Auto-Tune, automation can be used to adjust the retune speed, formant control, and other settings for specific parts of the vocal track. By automating the settings, you can create dynamic pitch effects that add depth and character to your music.
To automate Auto-Tune settings, follow these steps:
- Select the track you want to automate in your mix
- Choose the Auto-Tune plugin and open the automation window
- Select the parameter you want to automate, such as retune speed or formant control
- Set the automation points at the beginning and end of the desired section
- Adjust the parameter values for each point until you achieve the desired effect
For example, you could automate the retune speed to gradually increase as the song progresses, creating a more natural sound. Or you could use automation to apply a different formant control setting to specific sections of the song to add variety and interest.
Remember, Auto-Tune automation is all about experimentation and finding the right settings for your music. Don’t be afraid to try different things and see what sounds best. With practice, you’ll become an expert at automating Auto-Tune in your mix to take your music to the next level.
“Automation is a powerful tool for enhancing specific phrases or sections of your song.”
The Importance of Practice and Experimentation
Now that you have delved into the world of Auto-Tune, it’s time to perfect your skills. As with any craft, practice makes perfect. The more you experiment with different Auto-Tune settings, the better you will become at achieving the desired effect.
It’s essential to have a good ear when working with Auto-Tune. Train your ear to identify when pitch correction sounds unnatural and when it enhances the overall sound. Use your newfound knowledge to perfect your sound and create unique vocal effects that make your music stand out.
Don’t be afraid to try new things with Auto-Tune. Experiment with different settings and see how they affect your sound. Take note of the settings that work best for you and use them as a starting point in future projects.
Remember, Auto-Tune is a tool that should enhance your music, not define it. Don’t rely solely on Auto-Tune to correct pitch; use it to enhance your vocals and create unique effects that add to the overall sound of your music.
Embrace the journey of becoming an Auto-Tune expert. The more you experiment and practice, the more confident you will become in your skills. So continue exploring the endless possibilities Auto-Tune has to offer and let your music soar!
As you continue to practice and experiment with Auto-Tune, keep these essential Auto-Tune settings in mind:
| Auto-Tune Setting | Description |
|---|---|
| Retune Speed | Determines how quickly Auto-Tune corrects pitch. Lower values produce a more natural sound, while higher values produce a robotic effect. |
| Auto-Key | Automatically detects the key of your song and sets the scale for pitch correction. |
| Formant Control | Allows you to manipulate the vocal sound and create unique effects. |
| Flex-Tune | Allows for subtle pitch correction while preserving the natural sound of your vocals. |
These settings are just the beginning of what you can achieve with Auto-Tune. With practice and experimentation, you’ll discover new ways to perfect your sound and stand out among the crowd. So don’t hesitate to keep exploring and finding your unique voice with Auto-Tune.
Conclusion
And there you have it – the ultimate guide to using Auto-Tune to take your music to the next level. By mastering the art of Auto-Tune settings, you can create pitch-perfect recordings and unique vocal effects, enhancing your sound effortlessly.
Remember to take time to understand how Auto-Tune works and choose the right version for your needs – the auto-key feature is essential for accurate pitch correction! Setting up Auto-Tune for recording is also crucial to ensure a smooth process, and mastering the various settings is key to perfecting your sound.
Don’t be afraid to experiment with advanced techniques and automation within your mix – these can add depth and character to your music. If you encounter any issues, remember to troubleshoot common problems and learn how to blend Auto-Tune with manual pitch correction for a natural yet polished sound.
Ultimately, the key to being an Auto-Tune expert is practice and experimentation. If you would rather pass the auto-tuning off to me check out my mixing and mastering services here!
[/et_pb_text][/et_pb_column][/et_pb_row][/et_pb_section]