How to Build a DIY Vocal Booth: The Professional’s Guide to Perfect Sound Isolation
As a seasoned mixing and mastering engineer, I’ve seen firsthand how crucial a well-built vocal booth is to the recording process. Whether you’re laying down vocals, recording a podcast, or producing voice-overs, the clarity and quality of the audio can make or break your project. Today, I’m going to share my expertise on constructing a DIY vocal booth that won’t just serve as a makeshift space, but a professional-grade haven for pristine sound recording.
Understanding the Basics of a DIY Vocal Booth
What is a DIY Vocal Booth?
A DIY vocal booth, often called a home studio vocal booth or a do-it-yourself vocal booth, is essentially a sanctuary for sound. It’s an ingeniously crafted space to keep unwanted noise out and the perfect tone. The concept is simple: a well-insulated and acoustically treated enclosure that provides the isolation necessary for recording clear and crisp audio. But the benefits of building a vocal booth yourself go beyond sound. It’s a personal touch to your studio, a commitment to your craft, and a wise financial decision for savvy artists.
Essential Components of a Vocal Booth
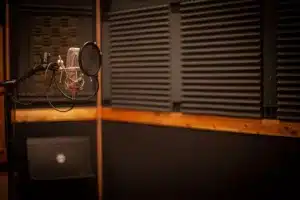
Every vocal booth DIY is built on two pillars: soundproofing and acoustic treatment. Soundproofing is your defense against the outside world. It keeps the neighbor’s lawnmower or the distant hum of traffic from invading your recordings. Acoustic treatment, on the other hand, is all about controlling the sound within your space. It’s the strategic placement of materials that absorb, diffuse, or reflect sound waves, ensuring your voice is captured just as you intend it to be.
In our quest to build the ultimate DIY vocal booth, we’ll delve into a comprehensive list of materials and tools, from the heft of soundproof panels to the delicate dance of acoustic foams. We’ll explore every construction process step, ensuring that your home vocal booth stands up to professional scrutiny.
Remember: Building a vocal booth is as much an art as it is a science. It’s about creating a space that you feel comfortable being in.
Before we dive into the details, let’s ground ourselves with a fundamental truth: a great vocal booth isn’t about the budget—it’s about the builder’s ingenuity and understanding of sound. With that in mind, let’s embark on this transformation journey from a simple closet vocal booth to an enviable vocal isolation booth that rivals professional studios.
Planning Your DIY Vocal Booth
Determining the Right Size and Location
When contemplating how to build a vocal booth, the first step is to identify the optimal location within your space. This could be a corner of a room, a spare closet, or a section of your garage. The key factors are isolation from external noise and the ability to control the sound within. Your booth should be large enough to house you and your recording equipment comfortably but not so large that it’s impractical to soundproof or falls outside your budget constraints.
A portable vocal booth is a viable alternative for those with space limitations. These can be set up and dismantled with ease and offer a flexible solution for various recording environments.
Budgeting for Your Vocal Booth
Cost is a pivotal aspect of the DIY process. Building a vocal booth doesn’t have to drain your wallet; it’s about investing smartly. To give you an idea, a basic home vocal booth can range from a few hundred to a couple of thousand dollars, depending on the materials and tools you choose. Keep an eye out for deals at hardware stores, and don’t shy away from second-hand materials that can still provide excellent soundproofing capabilities.

Materials and Tools Needed
List of Necessary Materials
- Soundproofing panels or Mass Loaded Vinyl (MLV) for solid sound isolation.
- Acoustic foam or fiberglass panels for internal sound treatment. Owens 703 is great for this
- Green Glue or another sound dampening compound to seal gaps and add an extra layer of soundproofing.
- Bass traps to control low frequencies and prevent muddiness.
- Sealant and weatherstripping to eliminate air gaps where sound can travel.
- A door or a heavy curtain for entry and exit that maintains the booth’s sound integrity.
Required Tools
- Tape measure for accurate dimensions.
- Utility knife for cutting materials to size.
- Caulking gun for applying sealant.
- Drill for assembling framework if necessary.
- Safety gear: gloves, goggles, and masks for handling insulation materials.
Remember, the quality of your DIY vocal booth is directly related to the quality of the materials you choose. Opt for materials that are not only effective but also safe for long-term exposure.
Building Your DIY Vocal Booth Step-by-Step
Constructing the Frame
The frame is the skeleton of your vocal recording booth. It should be sturdy and resilient. If you’re converting a closet into a vocal booth, the structure may already be in place. Otherwise, you can construct a simple frame using 2x4s. Ensure it’s secure and level, as this will form the basis of your soundproof vocal booth.
Adding Soundproofing and Acoustic Treatment
Here’s where the magic happens. Attach your soundproofing panels or MLV to the frame, ensuring there are no gaps. Next, layer your acoustic foam, strategically placing panels to minimize echo and standing waves. The goal is to create a flat frequency response for accurate recording.
Ventilation and Lighting
A well-ventilated space is essential for comfort during long recording sessions. Consider a silent ventilation system or strategically placed vents that won’t compromise your soundproofing. Lighting should be soft and non-intrusive, ideally with a dimmer to adjust for different times of the day and moods.
With these steps completed, you’ll have the shell of your vocal booth ready. Let’s add some final touches to personalize your space.
Finishing Touches and Customization
Interior Design and Comfort
The aesthetics and comfort of your vocal booth are as important as its functionality. After all, this is where you’ll be spending countless hours.
- Wall Treatment: Consider covering the walls with fabric or acoustic cloth to add a touch of personality while contributing to the acoustics.
- Flooring: Carpet or foam tiles can aid in reducing footfall noise and add comfort.
- Seating: A comfortable chair or stool that doesn’t squeak or make noise when you move is essential.
- Equipment Shelves: Build or install shelves for your recording gear, keeping it organized and within reach.
Your booth should be a reflection of your personality and a comfortable space that fosters creativity.
Testing and Making Adjustments
With construction complete, it’s time to test. Record various takes, listening back for any unwanted echoes, buzzes, or noise. Make adjustments as needed, possibly adding more acoustic treatment or sealing gaps you may have missed.
- Sound Check: Use a flat response microphone and monitor speakers to detect any frequency coloration.
- Decibel Reading: Take decibel readings at different spots in the booth to ensure even sound levels.
- Trial Recording: Record a test track and analyze the sound quality in your mixing environment.
Keep tweaking until the sound inside the booth is as close to perfect as you can make it.
Maintenance and Upkeep of Your Vocal Booth
Regular Maintenance Tips
A vocal booth is like a musical instrument; it performs best when well cared for.
- Dust Regularly: Keep the surfaces clean to ensure materials perform optimally.
- Check for Wear and Tear: Inspect the acoustic panels and soundproofing seals, replacing or repairing as necessary.
- Air Quality: Change air filters if you’ve installed a ventilation system.
By maintaining your vocal booth, you ensure its longevity and continued performance.
Conclusion
Building a DIY vocal booth is a rewarding project that significantly enhances the quality of your recordings. By following this guide, you’ve learned not just how to construct a vocal booth but how to create an environment that will help you capture your sound. Make sure to check out my mixing and mastering studio to see how mine was built
If you’re looking for professional mixing or mastering services, visit mixandmastermysong.com. You’ll also find presets and courses tailored to enhance your music production journey.