Introduction
Mixing Vocals in Studio One with Stock Plugins: My Professional Techniques for Beginners
As a seasoned audio engineer, I’ve often leaned on high-end tools like UAD and Waves plugins to mix vocals. However, I’ve discovered that the stock plugins in Studio One are not just a fallback option; they can yield surprisingly professional results. In this guide, I’ll share my personal techniques for mixing vocals using these accessible tools, showing beginners how to create polished vocal tracks in Studio One.
Section 1: The Power of Stock Plugins
In the world of digital audio production, the plugins you choose play a pivotal role in shaping your sound. While high-end plugins like those from UAD and Waves are renowned for their quality, I’ve found that the stock plugins in Studio One can be just as effective. This is particularly advantageous for beginners. These plugins are not only cost-effective, but they also integrate seamlessly into Studio One, making them easier to learn and use. Through my experience, I’ll demonstrate how you can achieve professional-quality mixes with these readily available tools.
Section 2: Initial Setup and Track Preparation
The first step in any vocal mixing session is the setup. In Studio One, I begin by setting the song’s tempo, ensuring everything syncs perfectly. Next comes importing the beats and vocal stems. It’s crucial to organize your tracks for easy navigation.
Panning and level adjustments come next. Panning helps in placing each vocal element in the stereo field, creating a more dynamic mix. I usually pan backing vocals slightly off-center to give the lead vocals prominence. Adjusting levels using faders is equally important. I aim for a balanced mix where the vocals sit comfortably with the beat without overpowering it.
Section 3: Basic EQ and Compression Techniques
A clean vocal track is the cornerstone of any good mix. To achieve this, I start with the fundamentals: EQ and compression. My first move is to apply a basic low-cut EQ. This helps in eliminating any low-frequency rumble and muddiness that often clutter the vocal recording. I typically set the low-cut filter around 80 Hz to 100 Hz, but this can vary depending on the voice and recording quality. This initial step is crucial as it instantly clarifies the vocal, making it more defined and upfront in the mix.
Once the EQ is set, I bring in the Fat Channel compressor available in Studio One. Compression, when used skillfully, is about adding control and bringing the vocals to the forefront of the mix without compromising their dynamic range. I start with a moderate ratio, like 3:1 or 4:1, which is enough to tame the peaks while maintaining the natural feel of the vocal performance. The threshold is adjusted so that the compressor engages only during the louder passages, ensuring that the quieter nuances of the performance are preserved.
The attack and release times are critical settings. A slower attack allows the initial transients of the words to pass through, preserving the clarity and articulation, while a quicker release time ensures the compressor doesn’t hold on to the sound for too long, which can make the vocals feel suppressed. The key is to listen and adjust these settings while keeping an ear out for any signs of over-compression, such as a squashed sound or loss of dynamics.
The aim here is to achieve a vocal sound that is both natural and present in the mix. It should stand out, yet feel seamlessly integrated with the other elements of the track.
Section 4: Advanced Techniques – Multiband Compression
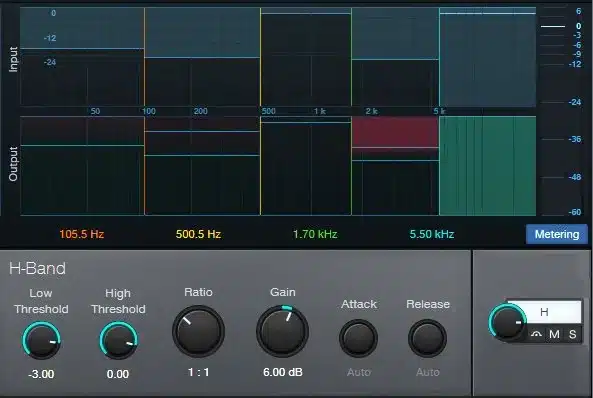
To further refine the vocal mix, I turn to one of my go-to tools: the multiband compressor. This powerful plugin allows me to zero in on specific frequency ranges that might be muddying up the vocals. It’s all about identifying and addressing the problematic frequencies without affecting the overall character of the voice.
When I mention cleaning up the low-mid and mid-range areas, I’m typically focusing on frequencies between 200 Hz and 500 Hz, a range where muddiness often resides. By applying subtle compression in this range, I can reduce the boominess and make the vocals sound cleaner and more focused.
For the mid-range, particularly between 500 Hz and 2 kHz, careful compression is crucial. This range can often carry boxy or nasal qualities in the vocals. By gently compressing these frequencies, I enhance vocal clarity and ensure that the voice blends well with the rest of the mix.
The key with multiband compression is subtlety. I usually start with a mild ratio and threshold settings, gradually adjusting until I find the sweet spot where the vocals sound clear and consistent, but still maintain their natural dynamics. It’s also important to be mindful of the attack and release settings to ensure the compressor reacts in a musical way, complementing the natural rhythm and phrasing of the vocals.
Section 5: Enhancing Vocal Brightness and Clarity
After smoothing out the mid-range frequencies, I shift my attention to refining the upper end of the vocal spectrum. This is crucial for achieving that polished, professional sound. I use another multiband compressor, this time focusing on the high frequencies, typically from 2 kHz upwards. This area is often where sibilance (sharp ‘s’ and ‘t’ sounds) and harshness can occur.
To manage sibilance, I carefully set the multiband compressor to compress only when these sharp sounds are detected. This targeted approach reduces the harshness without affecting the overall brightness and clarity of the vocals. The trick is to find the right threshold and ratio that tame the sibilance while maintaining the natural timbre of the voice.
In addition to multiband compression, I utilize a Pultec-style EQ in Studio One. This type of EQ is renowned for its ability to add a smooth, airy quality to the high end. I gently boost around the 10 kHz to 12 kHz range, which helps in bringing out a sense of air and openness in the vocals. This subtle lift in the high frequencies can dramatically enhance the perception of vocal clarity and detail, giving the track a more ‘expensive’ or high-end sound akin to what you’d hear in professional studios.
It’s important to balance this enhancement with the rest of the mix. Overdoing it can lead to an overly bright or harsh vocal, so I always make adjustments while continuously referencing the vocals within the full mix context. This ensures that the vocals sound great on their own and sit perfectly within the overall track.
Section 6: Parallel Compression Technique
Parallel compression is one of my favorite techniques for adding energy and presence to vocals. In this process, I create a heavily compressed version of the vocal and then blend it with the original signal. This technique allows the vocals to cut through the mix more effectively, bringing a sense of power and dynamism to the track. It’s especially useful for parts of the song where the vocals need to stand out, like the chorus.
Conclusion
Mixing vocals using only stock plugins in Studio One can yield impressive results. You can achieve a professional-sounding vocal mix with the right techniques, such as careful EQ adjustments, thoughtful compression, and creative use of parallel compression. I advise beginners to experiment with these techniques, understand the tools at your disposal, and trust your ears. Every track is unique, so what works for one song might need tweaking for another. Happy mixing!
Check the video below for the full breakdown
✅ Get Matty to Mix and Master your Studio One Song now!
✅ Get my FREE Mixing Template and Learn more about my Mixing and Mastering Presets Here!
Thanks!