Mastering Auto-Tune Pro: A Comprehensive Guide for Music Producers
Auto-Tune Pro by Antares has become the number one pitch correction software; I’ve been using it for years across genres, from pop to hip hop to easily manipulate and correct a vocalist’s pitch and timing. Since its launch in the late 90s, it has been used on countless hit songs to create iconic vocal effects and perfect performances. This article will guide you through everything you need to know to master Auto-Tune Pro, from the basics to advanced features and creative applications. Whether you’re a home studio producer or a mixing engineer, learn how to leverage Auto-Tune to take your tracks to the next level.
We’ll start by understanding exactly what Auto-Tune does and how it works. Then we’ll set it up with a real vocal track and run through the core pitch correction workflow. ( Watch the video to hear it in action) You’ll learn techniques to fix pitch issues seamlessly without losing vocal quality before exploring Auto-Tune’s more extreme effects. Advanced features like MIDI control and automation will demonstrate how dynamic and versatile this software can be. Insights from top producers, along with real song examples, will help you use autotune to achieve professional polish. Follow this masterclass and unlock the full potential of Auto-Tune for your own music production needs.

Understanding Auto-Tune Pro
First released in 1997 by Antares, Auto-Tune software utilized complex audio algorithms to detect pitch in vocals and then shift them to the nearest correct semitone. Thus being the first software that could make real-time pitch corrections while maintaining a natural sound. This revolutionary pitch correcter sparked the prolific use of pitch correction across the industry. Auto-Tune Pro builds on decades of innovation, offering superb sound quality and an intuitive workflow.
Auto-Tune Pro provides seamless, natural-sounding pitch correction, essential for fixing subtle imperfections. But its radical effects, like the iconic T-Pain robot voice, are equally legendary. Time correction features align vocal timing with instrumental tracks. An advanced Graph Mode enables surgical pitch and time editing. Auto Mode flexibly adapts to all types of vocal performances. Streamlined controls and MIDI modulation open creative possibilities.
Getting Started with Auto-Tune Pro
The first step to use Auto-Tune’s magic plug-in is installing and inserting it into your DAW session. As an AAX, AU, or VST plugin, it can be easily added to a vocal track like any other effect. It works the same in Pro Tools as it does in Logic, so don’t worry about whatever DAW you are using.
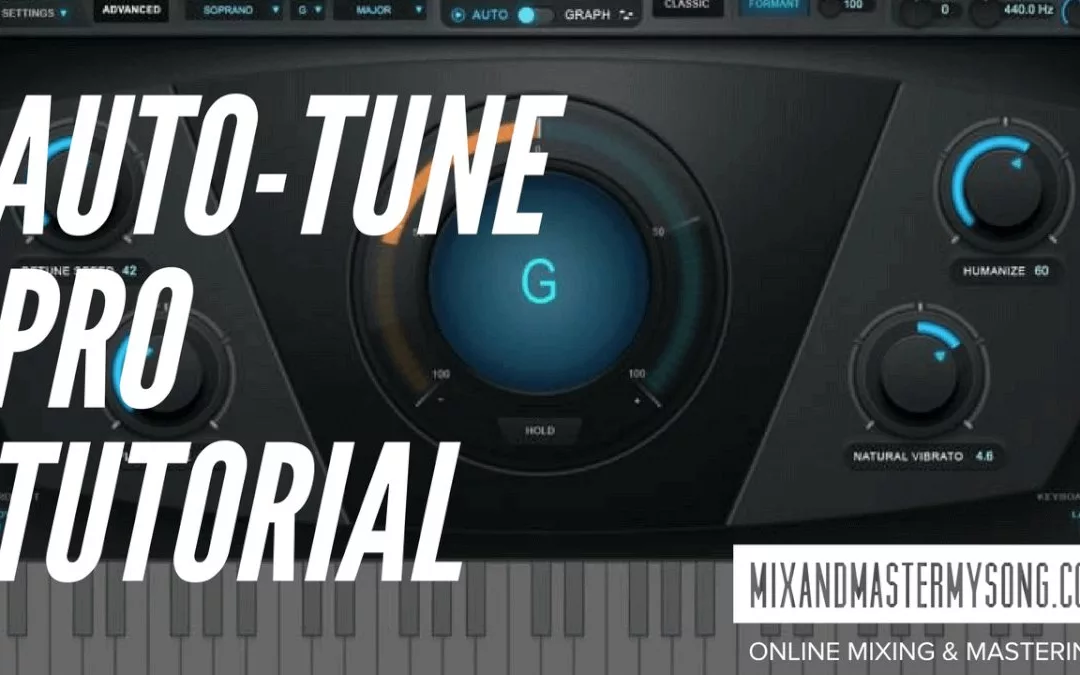
The clean Auto-Tune Pro interface prominently features a Main Pitch Window showing vocals notes detected by key and scale. Input Type lets you optimize for low male to high female registers. Basic Correction settings affect how aggressively pitches are shifted.
Navigate to the track you want to tune and engage record monitoring. Import your vocal part and make sure Auto-Tune Pro is inserted with active playback. Tweak input settings so the Main Pitch Window properly displays your notes. You’re now ready to start tuning!
Basic Tuning Techniques
Pitch correction is Auto-Tune’s most straightforward and essential application. Developing a gentle transparent tuning touch is important before exploring intentional effects. Here are the basic steps to set up Auto-Tune on a vocal track:
- Add Auto-Tune as an insert effect on the vocal track in your DAW.
- Set the input type to Soprano, Alto/Tenor, Low Male, or Instrument based on the vocal range.
- Select a suitable scale and find the key of your song. You can use the included Auto-Key plugin to find the key of the song or set the key manually.
- Set the retune speed between 25-50 for subtle pitch correction. Fast retune speeds like 0-10 are the signature Auto-Tune effect.
- Enable Automatic Mode and turn Graphic Mode off. Leave Antiformant on for most applications.
- Adjust the Humanize knob to add natural variation so it doesn’t sound robotic. Start around 25-50%.
- Play with the Flex-Tune knob to gently bend pitches between notes for a smooth pitch transition effect.
- Use the Tracking knob to adjust how quickly Auto-Tune responds to pitch changes. Faster is better for short notes.
- Tweak the Vibrato knob and handle other advanced settings as needed.
- Listen, tweak settings, A/B test bypass, and iteratively improve until you achieve the desired effect!
In Automatic Mode, Retune Speed determines how fast pitches are corrected. Faster settings sound more robotic. Humanize preserves slight pitch fluctuations for a looser feel. Flex-Tune transitions more smoothly between notes. Understanding these behaviors takes experimentation but subtle tuning avoids the dreaded “Auto-Tune effect.”
The powerful Graph Mode expands your pitch editing freedom. Here, nodes representing vocal notes can be dragged to desired frequencies. Though time-intensive, Graph allows surgical precision when fixing timing and intonation issues. Combining strengths of Automatic and Graph Modes lets producers mold polished, professional vocals.
The “Classic Mode” in Auto-Tune refers to the original automatic pitch correction algorithm that Auto-Tune was first known for. It snaps pitches to the nearest semitone for a more robotic, distorted vocal effect. This is the sound popularized in the late 90s/early 2000s in pop/R&B music.
Advanced Features and Techniques
Once you have transparent pitch correction down, explore Auto-Tune’s creative effects. The iconic T-Pain vocal style popularized in hip hop utilizes Retune Speed set to zero for instant pitch shifts. Vibrato controls add wavering texture. Formant adjustment retains unique tonal characteristics so corrected notes still sound natural. Notably, Auto-Tune 8 introduced the Automatic Pitch Curve which bends pitches between notes for seamless modulation well-suited for subtle pitch variation over an entire track.
Besides altering pitch, AutoTune also manipulates time. The Time Tools pane display a zoomed-in waveform for adjusting vocal timing against bars. Using time correction, sync backing vocals or align specific phonetic sounds to the beat. MIDI control takes real-time modulation even further. By mapping Auto-Tune parameters like Retune Speed to MIDI controls, producers can dynamically manipulate tuning, transforming voices over the course of a track for unprecedented expression.
Mixing and Automation
Mixing vocals treated by AutoTune requires balancing with other tracks. First, ensure no clashing frequencies with carefully sculpted EQ before adding effects. Auto-Tune works well with harmonizers and distortion but be cautious of conflicting pitch adjustments. Use send effects rather than inserts to retain Auto-Tune’s input signal when chaining processors.
Dynamic mixing is where automation enhances Auto-Tune’s capabilities over time. For example automating Retune Speed, slowing it down smoothly over a verse from fast robotic intervals towards human fluctuations at the chorus. Drawing automation curves for Formant Shift or Vibrato Depth also introduces captivating changes. Consider automation and MIDI mapping as invisible performers dueting with the vocalist by manipulating Auto-Tune’s parameters through the song timeline.
Tips from the Pros
Even experienced Auto-Tune users discover new techniques. Producer Noah “40” Shebib, known for shaping Drake’s sound declares: “I like to put Auto-Tune on a vocal even if I’m not going to correct anything…It makes the vocal sit properly in the track.”
Here are pro tips for success: Auto-Tune works best on isolated vocal tracks after recording. Tune notes to the key of instrumental backing for pleasing harmonic resonance. Set Retune Speed slower for transparent pitch correction rather than robotic effects. Adjust Amount to 50-80% to retain enough natural voice character. And don’t shy away from Graph Mode or automation for unlocking Auto-Tune’s full potential!
Case Study and Examples
To demonstrate Auto-Tune’s effects in action, Cher’s 1998 hit “Believe” provides an iconic case study. Producer Mark Taylor intentionally used extreme settings: Retune Speed at zero and Humanize off, for instantly corrected pitches. This striking robotic effect contrasted with Cher’s soaring voice, redefining pop vocals for the digital era.
In hip hop, Travis Scott’s atmospheric 2018 album Astroworld extensively layers Auto-Tune across Travis’s raw tones for a psychedelic feel. In the smash single “Sicko Mode”, manipulated autotuned harmonies echo and answer his leads. Across genres, Auto-Tune continues reimagining vocal sounds, especially when producers dare to push its boundaries.
Conclusion
Learning Auto-Tune Pro takes an investment of time and creativity but delivers unmatched vocal manipulation abilities. Start by nailing down transparent pitch correction before exploring Auto-Tune’s extensive effects. Remember to balance with careful mixing and dynamic automation. Embrace the full workflow from rapid Automatic Pitch Correction to detailed Graph Mode pitch editing. As you discover more techniques, Auto-Tune elevates vocals from fixed monotone perfection towards breathtaking transformations. Keep practicing, and you’ll be crafting chart-topping vocal magic in no time!
Watch the video to see the full review and if you would like to discuss mixing and mastering for your next project feel free to reach out.


Trackbacks/Pingbacks