How to Use External Hardware with PreSonus Studio One: The Complete Guide
Look, I’ve been mixing and mastering professionally for years now, working with artists like Kelly Clarkson and A$AP Rocky, and one thing I’ve learned is that external hardware can absolutely transform your mixes. But here’s the thing—if you don’t set it up correctly in Studio One, you’re going to deal with latency issues, phase problems, and a whole lot of frustration.
So today, I’m walking you through exactly how I integrate my external gear into my Studio One workflow. No fluff, just the exact steps you need to get your hardware sounding professional.
Why External Hardware Still Matters in 2024
Before we dive into the technical stuff, let me address the elephant in the room: “Matty, why would I use hardware when plugins are so good now?”
Fair question. Here’s my take: plugins have come incredibly far, but certain pieces of hardware—like my Silver Bullet, Avalon 747, and Weight Tank—have a vibe that’s hard to replicate. It’s not just about frequency response or THD specs. It’s about how the transformers saturate, how the circuit responds to transients, and honestly, the psychological effect of committing to a sound.
That said, hardware integration has to be done right, or you’re better off sticking with plugins.
Step 1: Understanding Your Audio Interface I/O
First things first—you need available inputs and outputs on your interface. This seems obvious, but I can’t tell you how many times I’ve seen people get tripped up here.
Here’s what you need:
- At least 2 spare outputs to send signal TO your hardware
- At least 2 spare inputs to receive signal FROM your hardware
- Low-latency monitoring capabilities (most modern interfaces have this)
I’m using a PreSonus Quantum interface, which has plenty of I/O, but this workflow works with any interface that has extra ins and outs.
Step 2: Physical Connections (Getting the Signal Flow Right)
This is where people mess up. The signal flow needs to be clean, or you’ll introduce noise and gain staging problems.
My setup:
- Connect outputs 3-4 from my interface to the inputs of my hardware compressor
- Connect the outputs of my hardware compressor to inputs 3-4 on my interface
- Make sure everything is set to the proper line level (usually -10dBV or +4dBu depending on your gear)
Pro tip: Label your cables. Seriously. I use color-coded cables—red for sends, blue for returns. It saves so much time when troubleshooting.
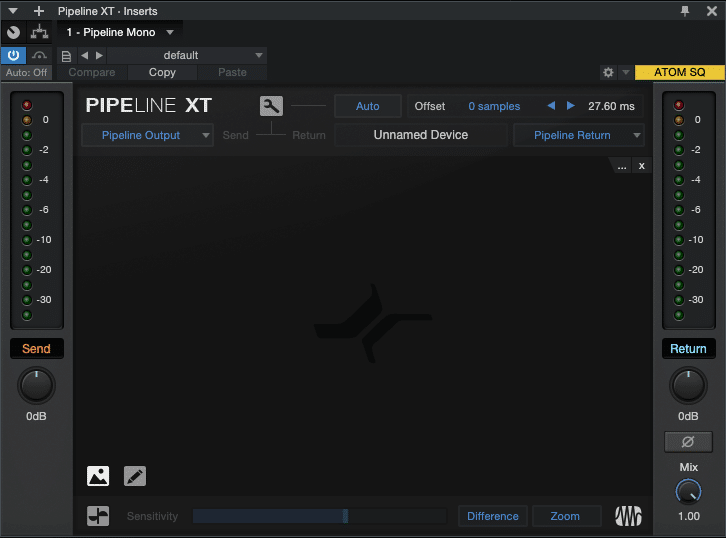
Step 3: Creating an External Device in Studio One
Now we’re getting to the good stuff. Studio One has a built-in feature specifically for hardware integration called “External Devices,” and it’s honestly brilliant once you understand it.
Here’s exactly how I set it up:
- Go to Studio One > Options (or Preferences on Mac)
- Click External Devices in the left sidebar
- Click Add to create a new external device
- Choose Device Type: External Effect
Now here’s where it gets specific:
Send Section:
- Set your Send Source to the outputs going TO your hardware (for me, outputs 3-4)
- Choose Mono or Stereo depending on your hardware
Receive Section:
- Set your Return to the inputs coming FROM your hardware (inputs 3-4 for me)
- Match the channel configuration (mono or stereo)
Delay Compensation:
This is critical. Studio One needs to know how much latency your hardware adds to the signal so it can compensate properly.
- Click Send Test Signal
- Studio One will automatically measure the round-trip latency
- It displays the delay in samples—don’t touch this number, Studio One handles it automatically
Give it a name: I name mine descriptively like “1176 Hardware Comp” or “Pultec EQ” so I know exactly what I’m grabbing.
Step 4: Using Your External Device in a Mix
Once you’ve set up your external device, using it is actually super straightforward.
Method 1: As an Insert Effect
- Select the track you want to process
- Open the insert effects slot
- Navigate to External Devices in the effects menu
- Select your hardware device
The signal now routes out to your hardware and back, with automatic delay compensation. It’s literally that simple.
Method 2: As a Bus Effect
This is how I typically use my SSL bus compressor:
- Create a bus/aux track
- Route multiple tracks to that bus
- Insert your external device on the bus
- Process multiple elements through the same hardware
Step 5: Managing Latency and Monitoring
Here’s where Studio One really shines. The delay compensation is automatic, but you need to understand what’s happening under the hood.
During Tracking:
If you’re recording through external hardware in real-time, enable Low Latency Monitoring in Studio One’s performance settings. This bypasses the DAW’s processing and gives you direct monitoring through your interface.
During Mixing:
Let Studio One handle the delay compensation automatically. The PDC (Plugin Delay Compensation) system accounts for the round-trip latency you measured earlier.
My workflow:
- I rarely track through hardware anymore—too many variables
- Instead, I commit to external processing during mixing
- I’ll print the hardware-processed signal to a new track if I’m happy with it
Step 6: Gain Staging Your Hardware
This is where amateur mixes fall apart. Your hardware has a sweet spot, and if you’re not hitting it correctly, you’re wasting your time.
My process:
- Send a test tone (-18dBFS) from Studio One through your external device
- Check the input meters on your hardware—you want healthy signal, not clipping
- Adjust the output gain from Studio One or your interface if needed
- Check the return signal level in Studio One—aim for unity gain (same level in and out before processing)
Pro tip: Most analog gear sounds best when you’re hitting the input moderately hard. Too soft and you’re just adding noise; too hot and you’re clipping. I typically aim for peaks around -3 to -6dB on the hardware’s input meters.
Step 7: Printing Your Hardware Passes (Best Practice)
Here’s something I learned from the big studios: commit and print. Here’s why:
Advantages of printing:
- Frees up your hardware for other tracks
- No more worrying about latency or settings changing
- You can apply additional plugin processing after the fact
- Better system performance (not constantly routing in real-time)
How I do it:
- Route the track with external processing to a new audio track
- Record the processed signal
- Disable the original track or external processing
- Work with the printed version
This is non-destructive because you still have the dry signal if you need to reprocess.
Troubleshooting Common Issues
Let me save you some headaches with the problems I’ve encountered:
Problem: Phasy or doubled sound
- Solution: You probably have both the dry and wet signal coming through. Disable the source track or make sure your external device is set to 100% wet.
Problem: Noise floor increased significantly
- Solution: Check your gain staging. You’re either sending too quiet a signal (increasing relative noise) or your hardware has a high noise floor. Consider a noise gate or recording hotter.
Problem: Latency isn’t compensating correctly
- Solution: Re-run the test signal calibration. Sometimes interface buffer settings change and throw off the measurement.
Problem: One channel is louder than the other
- Solution: Your hardware might have slight left/right imbalance, or your cables could be different impedances. Check with a meter and adjust output gain on the hardware itself.
Advanced Techniques I Use
Once you’ve mastered the basics, here are some pro-level techniques:
Parallel Hardware Processing:
Create a send/return bus instead of using your hardware as an insert. Send a portion of your signal through the hardware and blend it back in. This gives you the color of the hardware without completely replacing the dry signal.
Hardware Chain Processing:
Route multiple pieces of hardware in series. For example, I’ll sometimes run vocals through my Pultec EQ, then into my 1176, then into my SSL compressor. Set up each as a separate external device and chain them together.
Mid-Side Hardware Processing:
Use Studio One’s splitter plugin to split your signal into mid and side components, then process only the mid (or only the side) through your hardware. This is incredible for adding analog warmth to vocals while keeping the stereo field pristine.
My Final Thoughts
Integrating external hardware into Studio One isn’t just about the technical setup—it’s about workflow. The goal is to make using your hardware as seamless as using a plugin, and when you get there, that’s when the magic happens.
I still reach for hardware on almost every mix I do, especially on individual tracks. There’s something about running drums or bass through the silver bullet that does things in a way plugins can’t always match.
But here’s the key: don’t use hardware just because you can. Use it because it’s serving the song. Every piece of gear in my chain is there for a reason, and if a plugin would do the job better, I use the plugin.
If you found this helpful, I’ve got tons more mixing and mastering content on my YouTube channel where I break down these techniques with real examples. And if you ever need professional mixing or mastering, I run Mix and Master My Song—I’d love to work with you.
Now go hook up that hardware and make something incredible.
— Matty Harris




Did you get rid of your Faderport 8 and Console 1?
Hey! Yes I got rid of the faderport 8. I didn’t like the scribble strips, and I found myself just not using it much. So I sold it and now just have the single faderport. I feel it works best for me. 🙂