Introduction
Hello everyone, Matty here! In today’s blog, we’re diving deep into the world of drum mixing. Whether you’re a budding producer or a seasoned mixer, getting your live drums to sound professional is a game-changer for your tracks. At MixMasterMyon.com, not only do we offer top-notch drum mixing and mastering services, but we also provide vocal presets to enhance your music production. Let’s jump right in and explore how to transform your drum recordings!
The Foundation: Importance of a Good Drum Recording
The journey to exceptional drum mixing begins with the fundamental step of acquiring a high-quality drum recording. This might seem like a basic principle, but it’s a crucial one. The quality of your drum recording is not just a part of the mix; it’s the foundation upon which the entire mixing process is built. A well-recorded drum track can inspire the mixing process, bringing clarity, depth, and energy to your music.
When recording drums, especially at home, there are several key factors to consider. Room acoustics play a significant role in capturing the true essence of the drum sound. A poorly treated room can result in unwanted echoes, muddiness, or a lack of depth in your recordings. Investing in basic acoustic treatment or recording in a sonically pleasing space can make a significant difference.
Microphone choice and placement are also critical. Different microphones capture the nuances of a drum kit in various ways. For instance, dynamic mics are great for snare and toms, while condenser mics can beautifully capture the cymbals and overall kit ambiance. Experimenting with mic placements can help in capturing the best possible sound.
However, if you’re limited by your home recording setup, don’t fret. This is where professional studios come into play. A professional studio offers not just high-end equipment and a well-treated acoustic environment but also the expertise of sound engineers who know how to get the best out of a drum kit. The investment in a studio session, even if just for the drums, can elevate your track significantly.
Another fantastic option in today’s digital age is to collaborate with professional drummers and engineers online. Platforms like SoundBetter provide access to a global pool of talent. You can hire professionals to record high-quality drum tracks tailored to your project. This approach offers a substantial upgrade over programmed drums, adding authenticity and dynamism to your mix.
Panning: Crafting the Soundstage in Drum Mixing
Panning is a pivotal element in drum mixing, playing a crucial role in how the drum kit is positioned within the stereo field of your mix. It’s not just about placing sounds left or right; it’s about creating a realistic and immersive soundstage that enhances the overall listening experience.
There are two primary perspectives to consider when panning a drum set: the drummer’s perspective and the audience perspective. From the drummer’s perspective, the hi-hat is typically panned to the right, the ride cymbal to the left, and the toms are arranged accordingly from left to right, mimicking the layout of the kit from the drummer’s seat. This perspective is often favored by drummers and musicians, as it replicates the experience of sitting behind the drum kit, offering an intimate connection with the instrument.
On the other hand, the audience’s perspective flips this arrangement. The hi-hat is panned to the left, and the ride cymbal to the right, reflecting the view from in front of the stage. This approach is commonly used in live recordings and broadcasts, as it mirrors the listener’s experience at a live performance.
The choice between these two perspectives can significantly influence the feel of your mix. For example, in my work on L Rebel’s “Bye-Bye Mo Cowboy,” the drum tracks were initially set up from the audience’s perspective. However, given my background as a drummer, I often prefer to mix from the drummer’s perspective. This approach provides a more personal and enveloping experience, especially when using headphones, as it feels like you’re in the drummer’s seat.
When panning your drum components, it’s essential to consider the balance and interaction with other instruments in the mix. Panning should create a cohesive and balanced soundstage without isolating the drums too far from the rest of the band. For instance, if the guitar or keyboard is panned to one side, you might want to balance it with a drum element on the opposite side to maintain a harmonious stereo image.
Additionally, the genre of music can also influence your panning decisions. For example, a more natural and audience-oriented panning might be preferable in genres like jazz or acoustic, whereas in rock or pop, a drummer’s perspective can provide a more direct and impactful experience.
Experimentation is key in finding the right panning approach for your mix. Try both perspectives and see how they interact with the rest of your mix elements. Sometimes, even slight adjustments in panning can bring a new dimension to your drum sound, making it more lively and dynamic.
Phase Alignment: Ensuring Cohesive Drum Sounds
Phase Issues: The Invisible Culprit in Drum Mixing
Understanding and managing phase issues is critical in drum mixing, as it can dramatically affect the quality of your drum sound. When multiple microphones are used to record a drum kit, phase issues can arise due to the varying distances each mic is from the different parts of the drum kit. This can lead to certain frequencies canceling each other out or being overly emphasized, resulting in a drum sound that lacks punch, clarity, and depth.
Identifying Phase Issues
Phase problems are often not immediately apparent, especially to the untrained ear. The first sign of phase issues is usually a thin or hollow sound, particularly in the low frequencies. For instance, if your kick drum lacks bottom-end punch or your snare sounds weak, it could be a phase issue.
To identify phase problems, start by soloing two microphones that are likely to have phase interactions, such as the overheads and the snare mic. Listen carefully as you invert the phase of one mic (using a phase switch) and notice any changes in the sound. If the sound becomes fuller and more robust with the phase inverted, you’ve identified a phase issue.
Tools for Correcting Phase Issues
Modern mixing consoles and DAWs offer tools to deal with phase issues effectively. The SSL channel strip, for example, includes a phase inversion button that can be a quick fix for some phase problems. However, it’s important to note that simply flipping the phase 180 degrees may not always resolve the issue completely.
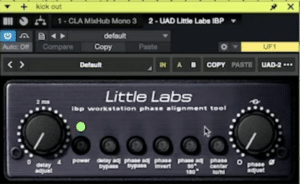
Tools like the Little Labs IBP (In-Between Phase) plugin on UAD platforms can be invaluable for more precise control. This plugin allows you to adjust the phase in smaller increments, not just 180 degrees, giving you the ability to fine-tune the phase relationship between microphones. This can be particularly useful when dealing with complex setups like multi-mic’d drum kits.
Advanced Phase Alignment Techniques
Sometimes, phase issues can’t be resolved with a simple button press. In these cases, you might need to manually adjust the timing of the tracks. This can be done by zooming in on the waveforms in your DAW and aligning them more closely. Small delays in one mic relative to another can cause phase cancellations, so this manual alignment can be a powerful technique.
Another advanced technique involves using time-alignment plugins or hardware. These tools measure the time difference between microphones and automatically adjust the timing to minimize phase issues. This can be particularly effective for aligning close mics with room mics or overheads.
The Importance of Mic Placement
Finally, it’s worth noting that the best way to address phase issues is at the source: during the recording stage. Careful microphone placement can prevent many phase problems from occurring in the first place. For instance, ensuring that overhead mics are equidistant from the snare can help maintain phase coherence. Similarly, using the 3:1 rule (where each mic is at least three times the distance from any other mic as those mics are from their source) can reduce phase issues between different drum mics.
4. Enhancing Drums with Samples
In the realm of modern drum mixing, the use of samples is not just a trend; it’s a transformative technique that can elevate your drum sound to professional standards. Samples can add depth, punch, and clarity to live drum recordings, filling in gaps that even the best microphones might miss.
Why Use Drum Samples?
Drum samples are pre-recorded, high-quality drum sounds that can be layered over your existing drum tracks. The primary reason for using them is to enhance or replace certain elements of the drum kit that may not have been captured optimally during the recording session. For example, if your live snare drum lacks attack or body, layering a snare sample can instantly add the necessary snap and fullness.
Choosing the Right Samples
The key to successful sample enhancement lies in choosing the right samples. The samples should complement your live drums, not overpower or conflict with them. It’s essential to select samples that match the tone and style of the music you’re working on. For instance, a tight, punchy snare sample might be perfect for a pop track, while a more open, resonant snare might suit a rock or indie song better.
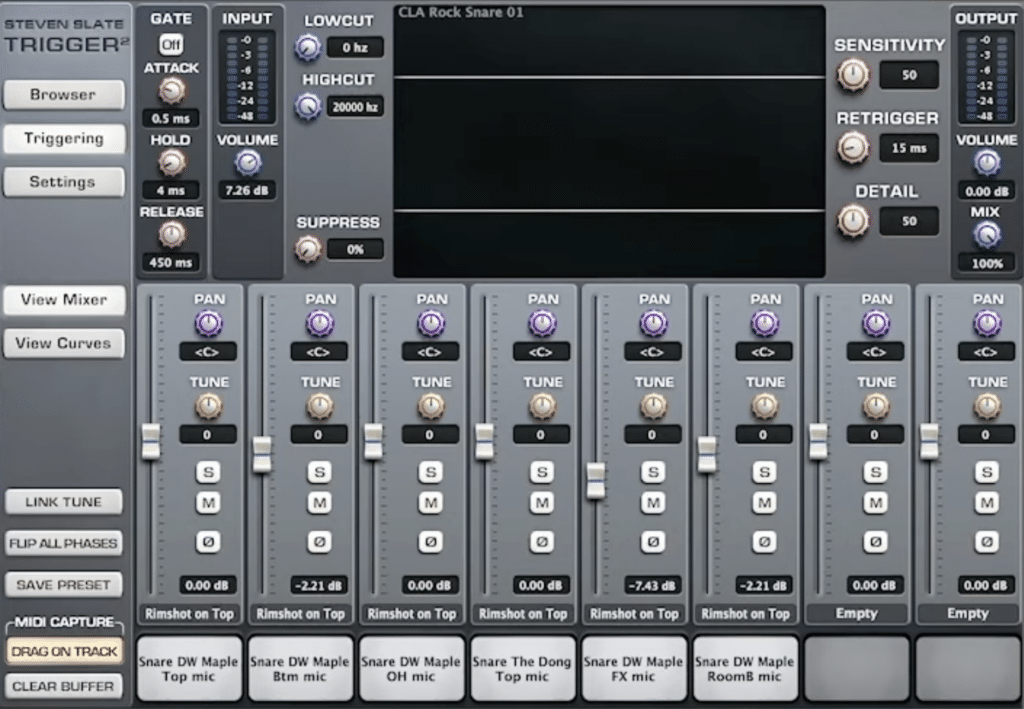
Using Slate’s Trigger for Sample Layering
Slate’s Trigger is a popular tool for drum sample layering. It allows you to seamlessly blend samples with your live drum tracks. The plugin analyzes the audio of your drum track and triggers the corresponding sample in real-time, aligning it perfectly with your live drum hits. This ensures that the enhanced sound remains natural and cohesive.
When using Trigger, you can adjust the level of the sample blend to achieve the desired balance. You might choose to have the sample subtly complement your live drums or be more prominent, depending on the needs of your mix.
Phase Alignment in Sample Layering
An important aspect to consider when layering samples is phase coherence. Just as with multiple drum mics, samples can cause phase issues when combined with live drums. Always check the phase relationship between your live drums and the samples. In Trigger, you can invert the phase of the sample if needed, ensuring that it adds to rather than detracts from your live drum sound.
Creative Possibilities with Samples
Beyond enhancing the existing drum sound, samples open up creative possibilities. You can experiment with different textures and tones that might be difficult to achieve with live drums alone. For instance, layering an electronic snare sample with an acoustic snare can create a unique hybrid sound, blending organic and electronic elements.
The Power of Parallel Compression: Enhancing Drum Dynamics
Parallel compression, often referred to as ‘New York compression,’ is a revered technique in the world of drum mixing. It’s a powerful tool that can inject life, punch, and energy into your drum tracks, making them stand out in the mix without sacrificing their natural dynamics.
Understanding Parallel Compression
The essence of parallel compression lies in its ability to blend a heavily compressed version of a signal with the original, uncompressed signal. This technique is particularly effective with dynamic instruments like drums, where you want to preserve the natural feel and transient response while adding a sense of power and fullness.
Setting Up Parallel Compression
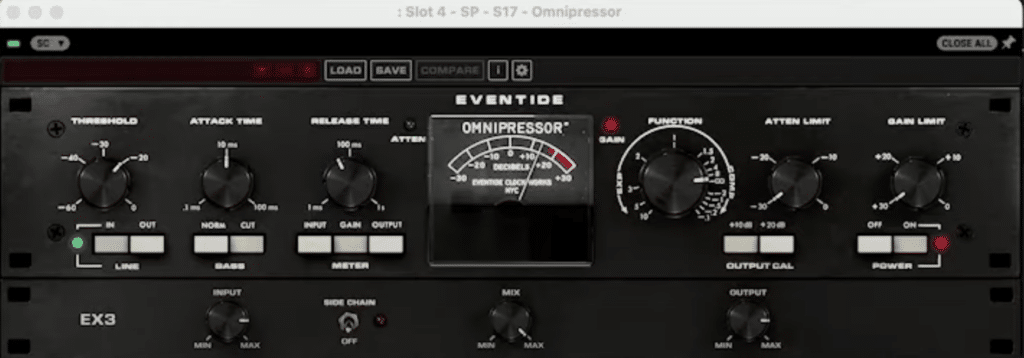
To set up parallel compression, you create a duplicate of your drum bus or individual drum tracks. On this duplicate track, apply a compressor with a high ratio, fast attack, and release settings. This compression squashes the dynamics, reducing the difference between the loudest and quietest parts of the performance. The key is to compress aggressively, achieving a consistent and powerful sound. I use the McDsp compressor as well as Eventide’s Omnipressor.
The choice of compressor for parallel compression can greatly influence the sound. Different compressors offer different tonal characteristics. For instance, an SSL-style compressor might add a punchy and tight sound, while a tube or vari-mu compressor could impart a warmer and more rounded tone. Experimenting with different compressors can help you find the perfect match for your drum sound.
Blending for Impact
Once you have your heavily compressed signal, the next step is to blend it with your original, uncompressed drum tracks. This is done by adjusting the balance between the two signals. The uncompressed track maintains the natural dynamics and transients of the drums, while the compressed track adds weight and consistency. The result is a drum sound that is both powerful and dynamic.
Parallel compression is most effective when applied judiciously. Applying it towards the end of your mixing process is recommended once you have a good balance with other instruments in the mix. This allows you to gauge how much compression is needed to make the drums stand out without overpowering the rest of the mix.
Applying to Specific Drum Elements
While parallel compression can be applied to the entire drum kit, it’s often most impactful on the kick and snare. These elements benefit greatly from the added punch and presence. However, be cautious with cymbals and hi-hats, as too much compression can make them sound harsh or overly prominent.
Conclusion
Drum mixing is an art that can dramatically enhance the quality of your music. You can achieve professional-sounding live drums in your mix by focusing on quality recordings, strategic panning, phase alignment, sample enhancement, and parallel compression. Remember, each track is unique, so don’t hesitate to experiment with these techniques.
If you’re looking for professional mixing and mastering services or high-quality vocal presets, be sure to check us out. We’re here to help you elevate your music to the next level!