

If you send a mixing engineer dry stems and no rough mix, I can almost guarantee you’ll be unhappy with what comes back.
I’ve been mixing for over 20 years, and how the files are prepared is the number one thing that decides whether a mix goes smoothly or turns into a ten-revision disaster. This is exactly what I ask artists to send me, and how to export it, step by step, in Logic Pro. The same principles work in any DAW.
The checklist
- Stem set 1: every track, exported with all your plugins on, exactly how your rough sounds.
- Stem set 2: your vocals, exported dry.
- A rough mix: one stereo bounce, WAV or MP3.
- The same bit depth and sample rate you recorded at. Never 16-bit.
- Reverb and effect buses printed as their own tracks.
- Export settings: audio tails on, volume and pan automation on, plugins not bypassed, normalization off.
- Your master bus: a saved preset or a screenshot of whatever is on it.
- One folder named with the song title and BPM, zipped.
Here’s the reasoning behind each one.
Don’t strip every plugin off before you export
One of the biggest misconceptions is that you should turn off every plugin in your session and send the files completely raw. That worked fine 15 years ago. A lot has changed.
Most artists and producers now use plugins while they build the production, and the line between mixing and production has blurred. A lot of those plugins have become part of the song. Strip them all off and you lose what the song has actually become: the way it grooves, the way it feels. That’s not something you want to throw away on the way to the mix.
Send two sets of stems
Set 1: everything, exactly as it is
Export every track just as your mix is right now. Don’t turn any plugins off. This gives the engineer the song exactly where you left it, and they can build the mix from there.
Set 2: dry vocals
Then export a second set completely dry. In practice this only really matters for vocals, because the vocal is where most of the work in a mix happens: cleaning it up, taking out the room sound, lining it up with the other vocals, tuning, EQ, compression, reverb and delay. (Here’s the vocal chain I start most mixes with.)
If the vocal arrives with reverb or delay printed on it, a lot of that is hard to do, and some of it is impossible. Lining up two vocals that both have reverb on them gets messy, and tuning a vocal with reverb on it is a definite no. With a dry vocal I can start from the beginning and build the space myself, with the reverb and delay chain I use on most of my mixes.
Two exceptions:
- Effects that are the sound. If you have a filtered, reverbed, delayed phone-effect vocal that pops up a few times, leave it on. That’s part of the production, and no engineer is going to recreate the exact six plugins you used to make it.
- Tuning you’re happy with. If you like how your Auto-Tune or Melodyne sounds, leave it on in the dry set. If you’re mostly happy but not 100% sure, send one version with the tuning and one without, and label them clearly.
A quick note on words: I say “stems” and “tracks” interchangeably, and I know that’s confusing. What you’re actually sending is one file per track in your session, not a handful of grouped submixes. I’m part of the problem.
Always send a rough mix
People ask why they need a rough mix when the stems already sound exactly like the song. Two reasons.
It catches export mistakes. Sometimes you export, think everything went fine, and something went wrong on the way out, so the stems don’t actually sound like your rough. I’ve also had sessions where the DAW said it exported every file and some of them simply weren’t there when I opened a new session. With a rough mix, the engineer can A/B the stems against it and confirm everything came across. A stereo bounce is all you need, WAV or MP3.
It keeps the vibe. While an engineer is improving the sonics, it’s possible to change the vibe of the song without meaning to. Your rough often has the energy you want to keep. Having it there to reference through the whole mix keeps the energy where it should be. In this hip hop mix, the artist’s rough is what told me to keep the vocal bright and the delay loud.
What bit depth and sample rate should stems be?
The same ones you recorded at. If you recorded at 24-bit, 44.1 kHz, send 24-bit, 44.1 kHz. If you recorded at 24-bit, 96 kHz, send it that way too (I don’t really recommend 96k unless you’re recording an orchestra, but that’s your call).
There’s no reason to convert. Changing the sample rate or bit depth can add artifacts or degrade the sound a little, and if a sample rate conversion really is needed, it can happen later in mastering.
Watch out for 16-bit. Some DAWs export at 16-bit by default. You don’t want to send stems at 16-bit, and hopefully you’re not recording at 16-bit either: record at 24-bit, or better yet 32-bit. I see 16-bit files come in all the time, and asking for a re-export can push your mix back three or four days. Sending the right files the first time means the song gets mixed on the day it’s scheduled.
Even better: send the session
When artists send songs to me, I ask for the Logic session, the Ableton session, or whatever DAW they’re working in. I’d rather export it myself, so I can see and hear everything in your mix and decide which plugins to keep before I start. If you can only send stems, here’s how to do it properly.
How to export stems in Logic Pro
1. Print your reverb and effect buses as tracks
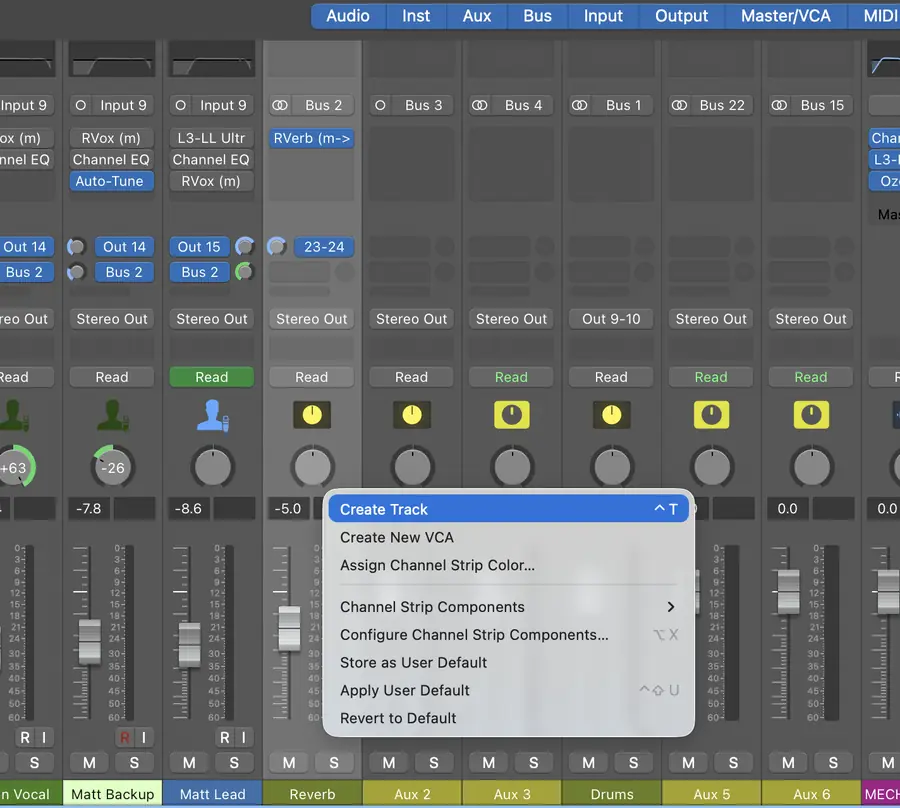
Look at your sends. If you have a bus with a reverb on it, the engineer needs to hear that too. In Logic, select the aux channel, right-click and choose Create Track. It now shows up in the Tracks area, and when you export it prints just that reverb, from whatever is being sent to it. (Ignore outputs that only feed a headphone mix.)
2. Select every track
In the Tracks area, click the last track, scroll up, then Shift-click the first one. Every track in the session is now selected.
3. Export the selected tracks
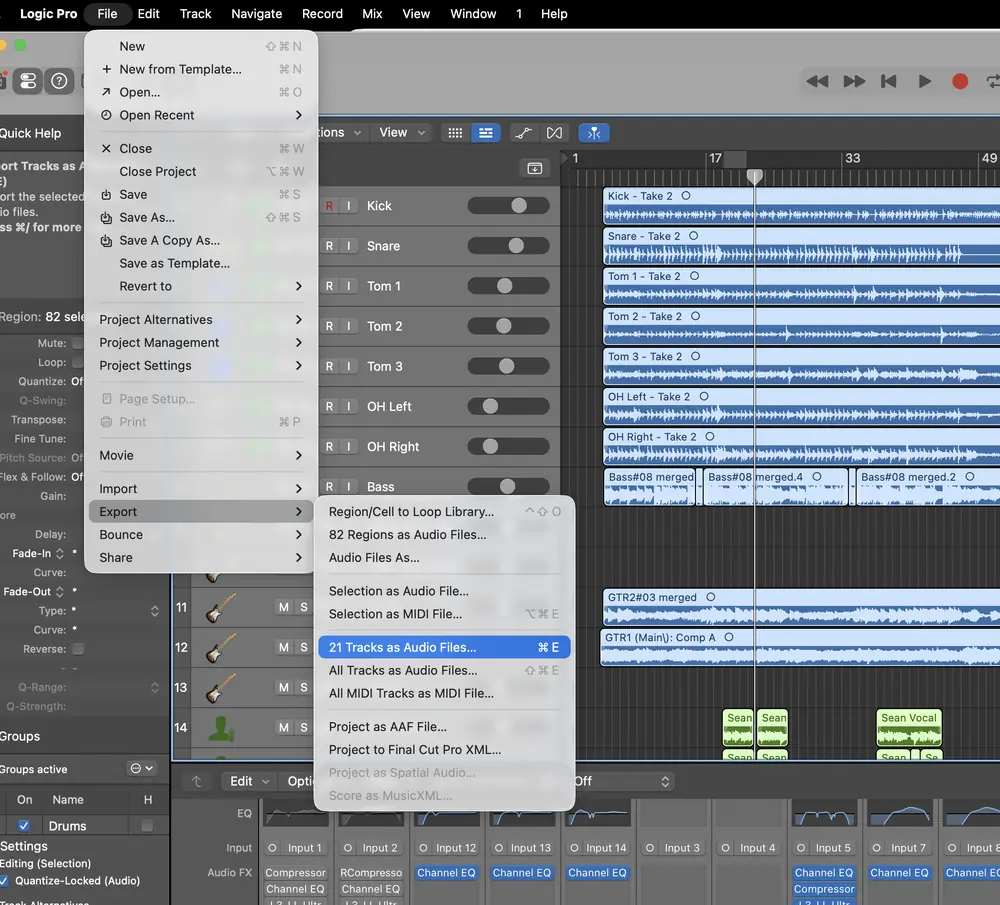
Go to File > Export > [number] Tracks as Audio Files. The number is however many tracks you selected (the shortcut is Command-E). Use this option, not “All Tracks as Audio Files”, which can get weird.
4. Get the export settings right
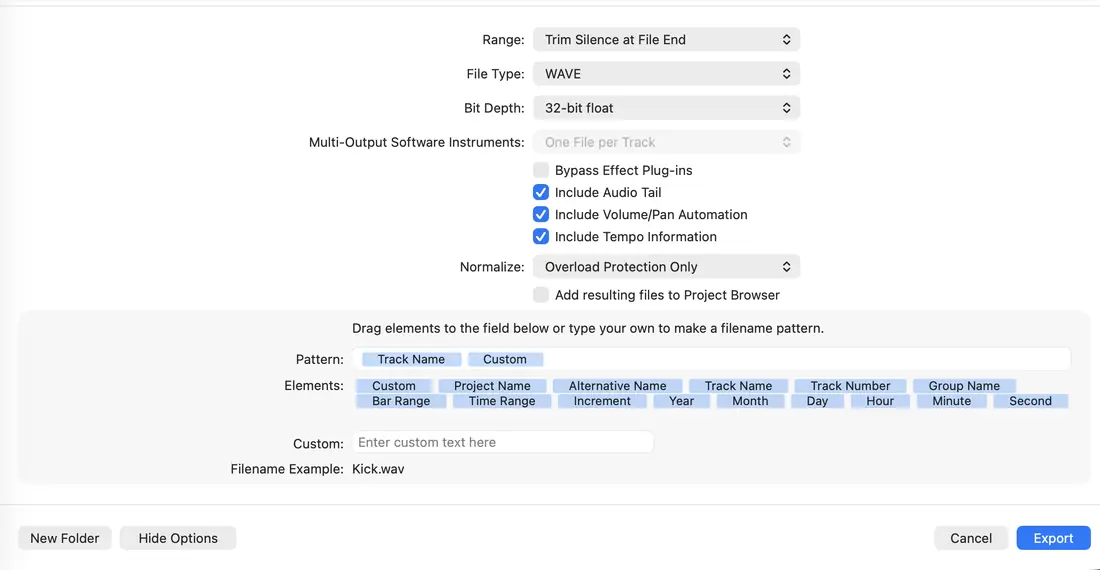
Most people just hit Export here. Don’t. Check these:
- Include Audio Tail: on. If a track ends but its reverb keeps ringing, the tail still gets printed. That matters most at the end of the song.
- Include Volume/Pan Automation: on. A lot of volume and pan automation is part of the production. Leave this off and the levels you’ve been working with come out wrong, and you end up in revisions asking why the pan move at bar 32 isn’t there.
- Bypass Effect Plug-ins: off. This is the first pass, with everything on.
- Normalize: Overload Protection Only. Not full normalization. Overload protection rarely kicks in, but it’s a good just-in-case.
- Bit depth and sample rate: whatever you recorded at (see above).
- Tempo information: include it or don’t, either is fine.
- File names: leave the pattern on Track Name, so each file is named after its track (Kick.wav, Snare.wav). That’s why it’s worth naming your tracks properly before you export.
5. Export into a new folder named with the song and BPM
Before you hit Export, pick somewhere you’ll actually find (some people’s desktops are worse than others), click New Folder, and name it with the song title and the BPM, for example “Song Title BPM 96”. Every stem lands in one folder, you zip it, and you’re done.
6. Tell the engineer what’s on your master bus
Anything on your master bus doesn’t export with the stems. That can change the sound of the song a lot, especially if you’ve been working into something like Ozone, with Master Rebalance and big EQ moves shaping the whole rough. If you’ve been mixing into it the whole time, the song can fall apart without it.
Save the preset and send it, or at least send screenshots of the settings. When I get one, I load it into my mix session, keep everything the artist had, then pull things away slowly, or keep them if they actually work for the mix.
7. Export the dry vocals
Now the second pass. Select just the vocal tracks and turn off their plugins, except tuning you’re happy with and any effect that is the sound (see above). Don’t include the reverb track this time, since these should be dry.
Go to File > Export > [number] Tracks as Audio Files again, make a new folder inside your song folder called “Dry Vocals”, use the same settings, and export.
8. Zip it and send it with your rough mix
Zip the song folder, add the rough mix and the master bus preset or screenshots, and send it all together.
Using a different DAW?
Every DAW exports tracks a little differently, so check your manual for the exact menu. The principles are the same everywhere: one file per track, one full set with plugins on, one dry vocal set, effect buses printed, tails and automation included, no normalization, and the bit depth and sample rate you recorded at.
Ready to send your song?
This is exactly what I ask for when you book a mix with me. If you’re not sure about any of it, send the session or ask me before you export, and I’ll tell you what I need.
Online Mixing and Mastering
Stems ready? Send them to me.
$349 a song, mixed and mastered, 3 to 5 business days. I handle every song personally.
Get Your Song MixedFAQ
Should I send stems to a mixing engineer wet or dry?
Both. Send one full set exactly as your rough sounds, with every plugin on, and a second set of dry vocals. Keep tuning you’re happy with and any effect that is the sound, like a phone-effect vocal, on the dry set.
What bit depth and sample rate should stems be?
The same bit depth and sample rate you recorded at. Don’t convert them, and don’t export at 16-bit, which some DAWs do by default. 24-bit at 44.1 or 48 kHz is typical.
Do I need to send a rough mix with my stems?
Yes. The engineer uses it to check every stem exported correctly and to keep the vibe and energy of your song while improving the sound. A stereo WAV or MP3 bounce is enough.
Should I include my reverb buses when exporting stems?
Yes. Print each reverb or effect bus as its own track so the engineer hears it. In Logic, right-click the aux channel and choose Create Track, then export it with the rest.
Very insightful