Introduction
Mastering is one of those final steps that can make or break how your music feels when it hits someone’s speakers. Whether you’re wrapping up an EP or just trying to get a few tracks to sound cohesive, having a reliable workflow matters—and Studio One has one of the best built-in mastering tools around: the Project Page.
I’ve mastered hundreds of songs in Studio One, and what I love most is how seamless it makes the process. You don’t need a bunch of extra software or complicated routing tricks. Just bring in your final mixes, line them up, dial in your chain, and you’re ready to go.
In this post, I’ll walk you through how I personally master songs inside Studio One—from setting up your project and loading tracks to loudness matching, plugin choices, and final export. Whether you’re mastering for Spotify, preparing a demo for a label, or just want your music to sound better, this is the exact process I use every day in my studio.
Let’s dive in.
Why Studio One’s Project Page is Built for Mastering
One of the most underrated features in Studio One is the Project Page. A lot of people don’t even realize it exists, but once you discover it, it completely changes how you approach mastering. It’s essentially a dedicated mastering environment built right into the DAW—and the way it’s designed makes it feel like you’re using a separate piece of software entirely.
What makes the Project Page so useful is how it brings all your finished mixes into one timeline while still giving you the flexibility to process each song individually. That means you can tweak EQ or loudness on a per-track basis, set the order of the songs, adjust spacing between them, and even apply final processing across the whole project if you want.
It’s perfect for mastering full albums or EPs—but it’s just as powerful for polishing a couple of tracks before you send them out to a label, playlist curator, or even just friends. You don’t have to bounce between multiple sessions or try to master within the same mix project. Everything’s in one place, and it keeps you focused on finishing the music instead of managing files and routing.
Setting Up Your Mastering Session
Getting started in the Project Page is quick and straightforward, but there are a few important things to set right from the beginning.
First, create a new project and give it a name that reflects what you’re working on—whether it’s a client EP, your own demos, or a single release. Choose your sample rate to match the mixes you’re working with (usually 44.1kHz, unless you’re working in higher-res formats like 48kHz or 96kHz).
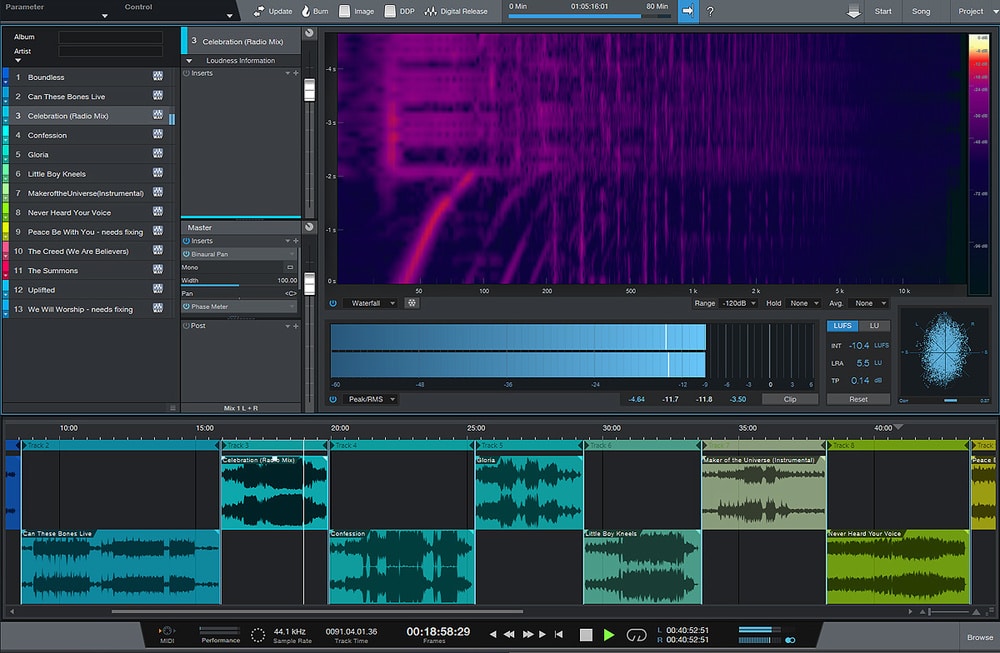
Once the project is created, drag your final mixdowns into the timeline. Studio One will lay them out in sequence, giving you a clear view of the full tracklist. This is where you start thinking like a listener—adjust the spacing between songs, create fades if needed, or leave gaps if you’re aiming for a more classic album feel.
This timeline-based view makes it easy to get your transitions right. Whether you want tight spacing like a playlist or intentional breathing room between tracks, it’s all under your control. You can even crossfade between songs directly on the timeline if you want that kind of creative flow.
Before you move on, take a moment to label your songs, add track numbers, and input artist metadata. These details matter when you’re preparing for digital distribution, and it keeps everything organized right from the start.
Plugin Workflow: Track Inserts vs Master Processing
One of the most powerful features in Studio One’s Project Page is how it handles plugins. You can apply processing either to individual songs using track inserts, or across the entire project using the master section. Both have their place, but knowing when to use each is key to a clean, balanced master.
Let’s start with track inserts. These are perfect for tailoring your processing to each individual song. If one track needs a bit more top-end or a slight boost in volume, you can handle that without affecting the others. This is where I do most of my heavy lifting—EQ, compression, saturation, limiting—it all happens right here. For example, I often use Brainworx Masterdesk on each song because it gives me that polished sound quickly and reliably. (If you want a deep dive on it, I’ve got a full review on my YouTube channel.)
Now let’s talk about the master section. This is where you can place plugins that affect every song in the project—great for final limiting, stereo imaging, or metering. Sometimes I’ll throw a transparent limiter here just to catch any stray peaks, but I usually rely on track-level limiting so I can fine-tune how each song hits.
The beauty of this setup is that it gives you flexibility without confusion. You can dial in the right sound per track, then make sure everything gels together with light touches on the master bus. And if one song needs something totally different? No problem—it won’t mess with the rest.
Matching Loudness and Tone Across Your Tracks
Once your songs are loaded and your plugins are in place, the real art of mastering begins: getting all the tracks to feel cohesive. That means making sure no single song jumps out too loud—or sinks too quiet—while also keeping the tone balanced across the board.
Here’s my go-to method: I always start with the loudest song in the project. That becomes the benchmark. If you master a quiet song first and push it to the limit, you’ll often find that louder songs clip or distort when you try to match them later. By starting with the most aggressive or energetic track, you work from a point of strength—and everything else falls into place more naturally.
Once that’s locked in, I move down the line and level-match the rest of the songs. I’m watching meters, sure—but more importantly, I’m using my ears. The BX Meter and TC Electronic Clarity M are great tools for tracking RMS and LUFS, and I generally shoot for around -6 RMS for modern hip-hop and pop. But numbers only get you so far. If two tracks are hitting the same meter but one sounds noticeably quieter, I trust my ears and make adjustments.
This is also where I might make some light EQ tweaks. Maybe one track needs a bit more midrange to compete, or another has a harsh top-end that needs taming. These aren’t big mix changes—they’re subtle moves to get all the tracks living in the same sonic world.
Bottom line: matching loudness and tone isn’t just about meters—it’s about musical feel. If the tracks play back smoothly, feel consistent, and hit with the same energy, you’re in a great place.
Monitoring Levels Like a Pro
You can’t master what you can’t hear clearly. That’s why accurate metering and critical listening are essential parts of the process.
I rely heavily on a few key tools when mastering in Studio One. First is the Brainworx BX Meter, which gives me a clear read on RMS, peak, and dynamic range. I pair that with the TC Electronic Clarity M, which adds another level of insight. Between the two, I can see exactly where my songs are sitting in terms of loudness, balance, and stereo image.
For most modern music—especially hip-hop and pop—I’m aiming for around -6 RMS. That gives the track enough weight and volume to stand next to commercial releases without squashing the life out of it. If you push it harder, you risk distortion and fatigue. If you go too soft, your track might get lost in the shuffle.
But even with meters in front of me, I always go back to the most important reference: my ears. Meters can tell you if something is technically balanced, but only listening will tell you if it feels right. Some songs might look quieter but feel louder because of their arrangement, tone, or mix choices. That’s why I do plenty of A/B testing—comparing my masters with each other, and with well-mixed commercial tracks.
Monitoring also means paying attention to how your adjustments translate at different volumes. If a master only sounds good when it’s cranked, that’s a red flag. The goal is consistency—something that works on headphones, in the car, and on a Bluetooth speaker.
Exporting and Final Delivery
Once your tracks are sounding tight and consistent, it’s time to get them out into the world. Studio One makes this super easy with several export options built right into the Project Page.
For most of my work, I go with Digital Release mode. It lets you export high-quality WAV or MP3 files of all your mastered tracks in one shot. You can also label your songs, add track numbers, and input metadata like artist name or album title—super helpful if you’re releasing your project to streaming platforms or sending it off to a label.
Studio One also gives you the option to create a DDP image, which is useful if you’re sending your project to a CD duplicator. Even though that’s less common now, it’s nice to have the option. There’s also a SoundCloud export feature if you want to publish directly, though I personally prefer to bounce the files and upload manually.
Before hitting export, double-check your track order, spacing, fades, and file names. It’s easy to overlook small details when you’re deep in the mastering zone. I like to create a dedicated folder for each project’s final deliverables so everything’s clean and organized.
And that’s it—your mastered project is ready to go.
Mastering in Studio One doesn’t have to be complicated—it just needs to be intentional. The Project Page gives you all the tools you need to finalize your tracks with confidence, whether you’re releasing a full album or just polishing a few songs for a demo or playlist.
By setting up your session properly, dialing in the right processing for each track, and keeping an ear on loudness and tone, you’ll be able to deliver music that not only sounds great—but sounds like it belongs next to the pros.
If you want to skip the learning curve and have me master your song personally, head over to Mix and Master My Song. I also offer a full mixing course if you’re looking to take more control over your own sound.
Thanks for reading—and if you found this helpful, definitely check out my YouTube channel for more tutorials like this one.