How to Master Automation in Pro Tools: A Professional’s Guide
Hello there! I’m Matty, a seasoned mixing and mastering engineer. Today, I’m excited to dive deep into a topic that’s close to my heart and crucial in the world of digital audio production: How to Use Automation in Pro Tools. Whether you’re just starting out or looking to refine your skills, this guide is designed to provide you with comprehensive, in-depth knowledge, and practical tips on mastering automation in Pro Tools.
Understanding Automation Modes in Pro Tools
The Foundation of Dynamic Mixing
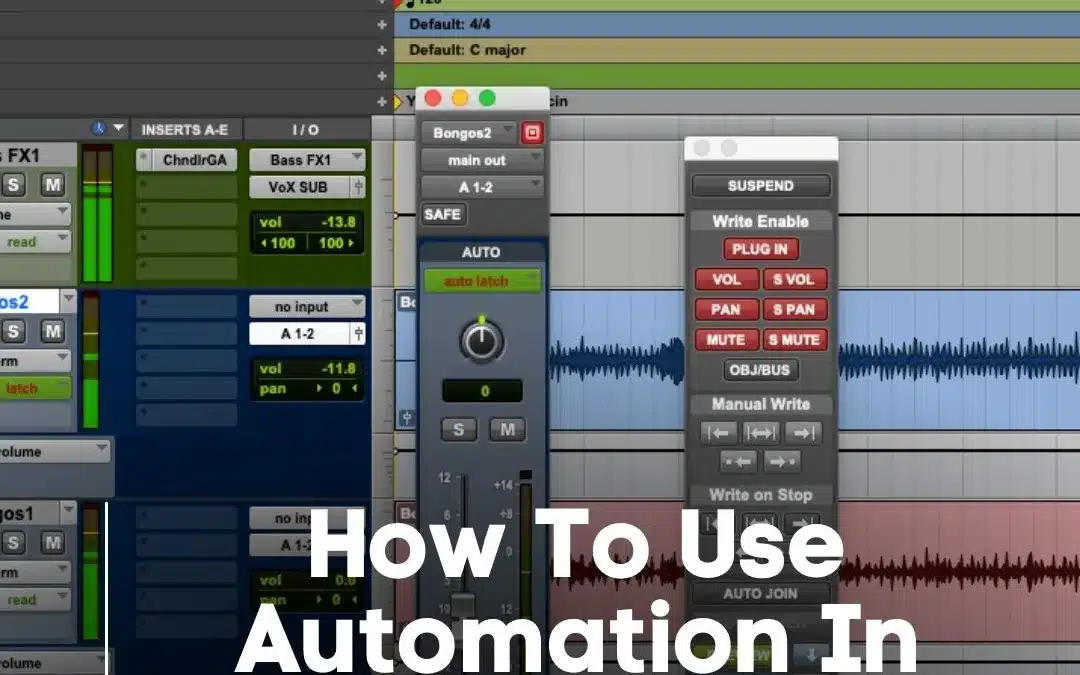
Automation in Pro Tools is like the painter’s brush in a masterpiece. It’s not just about moving faders; it’s about bringing life and dynamics to your mix. Pro Tools offers a variety of automation modes, each serving a unique purpose:
- Off Mode: This is your canvas before the brush touches it. No automation is applied, giving you a blank slate.
- Read Mode: Think of this as your playback mode. It reads and applies any pre-written automation on the track.
- Touch Mode: Here’s where your intuition comes into play. Adjust parameters like volume or pan during playback, and upon release, it snaps back to the original automation. It’s perfect for quick, intuitive adjustments.
- Latch Mode: Similar to Touch, but with a twist. The adjustments you make stay put even after you release the control. It’s great for making lasting changes on the fly.
- Touch/Latch Mode: A hybrid that offers the best of both worlds. It gives you the flexibility of Touch and the persistence of Latch.
- Write Mode: The bold artist’s mode. It writes automation in real-time and overwrites any existing data. Use it when you’re confident about the changes you want to make.
- Trim Mode (Pro Tools Ultimate): For the fine artists. It allows you to tweak existing automation without rewriting it entirely.
Practical Application
As a professional, I often start with Read mode to get a sense of the existing automation landscape. When I need to make adjustments, I switch to Touch or Latch mode, depending on whether I want the changes to be temporary or permanent. Write mode is my go-to for creating automation from scratch, especially when I have a clear vision of the end result.
Automating Parameters: The Art of Control
Crafting Your Sound
In Pro Tools, automation isn’t just a feature; it’s an art form. It allows you to control various parameters over time, adding depth and emotion to your mix. Here’s how you can master this art:
- Volume Automation: This is where I spend most of my time. Adjusting the volume of tracks over time can bring out the lead in a chorus or soften an instrument in a verse. It’s about creating a dynamic journey for the listener.
- Pan Automation: Moving sounds across the stereo field can be magical. It can create a sense of movement and space. Imagine a guitar riff that travels from left to right, adding a new dimension to your mix.
- Mute Automation: Sometimes, silence speaks louder than sound. Muting certain parts of a track at specific moments can create impact and focus on other elements.
- Plugin Parameter Automation: This is where Pro Tools truly shines. Automating plugin parameters like reverb depth, delay feedback, or EQ settings can transform a static mix into a living, breathing entity.
Deep Dive into Techniques
- Drawing Automation: For precise control, I often draw automation curves directly onto the track. This method is perfect for detailed work, like sculpting the fade of a note or the swell of a chorus.
- Real-Time Automation: When I feel the music, I prefer real-time automation. Moving faders or knobs as the track plays back captures the emotion and energy of the moment.
Case Study
In a recent project, I used volume automation to create a crescendo in a climactic bridge section. By gradually increasing the volume of the strings, I achieved an emotional peak that left the listeners with goosebumps.
Fine-Tuning Automation: The Key to a Polished Mix
The Art of Refinement
After laying down the basic automation, the next step is fine-tuning. This is where your mix transitions from good to great. It’s about refining the details to achieve a polished, professional sound.
Using Trim Mode in Pro Tools Ultimate
For those with Pro Tools Ultimate, Trim mode is a game-changer. It allows you to adjust existing automation curves without rewriting them. This is particularly useful for:
- Subtle Volume Adjustments: Sometimes, all a track needs is a slight volume tweak to sit perfectly in the mix.
- Refining Dynamic Changes: You can smooth out any abrupt changes in your automation, ensuring a natural flow.
Editing Automation Data
Pro Tools offers robust tools for editing automation:
- Breaking and Moving Points: You can break automation lines at specific points and move them to adjust the level or timing.
- Curve Adjustments: Adjusting the shape of automation curves can change the character of a transition, making it more gradual or abrupt.
Advanced Techniques
- Preview Mode: This often-overlooked feature lets you audition changes before committing them, ensuring you make the right decision.
- Copy/Paste Automation: For repetitive elements, copying and pasting automation data can save time and maintain consistency.
Real-World Example
In a mix I worked on recently, I used Trim mode to fine-tune the automation on a vocal track. The singer had a wide dynamic range, and Trim mode allowed me to smooth out the levels for a consistent sound without losing the emotional impact.
Viewing and Editing Automation: A Visual Approach
The Power of Visualization
In Pro Tools, seeing your automation is as crucial as hearing it. The visual aspect allows you to understand the dynamics of your mix at a glance and make informed decisions.
Viewing Automation Data
- Automation Lanes: Each track in Pro Tools has dedicated automation lanes. These lanes display automation data for volume, pan, and other parameters as lines or curves over the timeline.
- Color Coding: Pro Tools uses different colors for different types of automation, making it easy to distinguish between them.
Editing with Precision
- Drawing Automation: For surgical precision, I often draw automation directly onto the lanes. This method is perfect for crafting exact fades or specific parameter changes.
- Adjusting Points and Curves: You can click to add points on the automation curve and drag them to adjust levels or timing. This method offers a high level of control and is ideal for fine-tuning.
Tips for Effective Editing
- Zoom In for Detail: When working on intricate automation, zoom in to see the finer details.
- Use Grid Mode for Timing: Aligning automation points with the grid ensures they are in time with the music.
- Experiment with Different Curve Shapes: Pro Tools offers various curve shapes for different effects, like linear, logarithmic, or S-curve.
Case Study: Dynamic Mixing
In a recent project, I used the visual editing capabilities to automate a complex drum pattern. By visually aligning the volume automation of the snare hits with the rhythm, I achieved a dynamic and pulsating effect that brought the track to life.
Tips for Effective Automation in Pro Tools
Harnessing the Full Potential
Automation in Pro Tools is a powerful tool, and mastering it can elevate your mixes to professional standards. Here are some essential tips to help you harness its full potential:
1. Start Simple
- Begin with Basic Parameters: Start with fundamental parameters like volume and pan before moving to more complex automation.
- Use Read Mode for Learning: Familiarize yourself with existing automation by observing how it affects the mix in Read mode.
2. Be Cautious with Write Mode
- Overwrite with Care: Remember, Write mode overwrites existing automation. Use it when you’re sure of the changes you want to make.
- Practice in a Test Session: Before applying Write mode in a critical project, practice in a test session to understand its impact.
3. Explore Trim Mode (Pro Tools Ultimate)
- Refine Existing Automation: Use Trim mode to make subtle adjustments without starting from scratch.
- Perfect for Final Touches: It’s ideal for adding the final touches to your mix, ensuring everything sits perfectly.
4. Practice and Experiment
- Regular Practice: The best way to master automation is through regular practice.
- Experiment with Different Modes: Try out different automation modes to understand their impact on your mix.
5. Use Automation to Tell a Story
- Emotional Impact: Use automation to enhance the emotional impact of your music. For instance, gradually increasing the volume of a track can build intensity leading up to a chorus.
Real-Life Application
In my career, automation has been a cornerstone of my mixing process. For example, in a recent mix, I automated the reverb depth on a vocal track to increase during certain phrases, adding a sense of space and depth that made the vocals stand out.
Conclusion
Automation in Pro Tools is an essential skill for any mixing and mastering engineer. By understanding and utilizing the different modes, practicing regularly, and applying these tips, you can create dynamic, engaging, and professional mixes.
That wraps up our comprehensive guide on using automation in Pro Tools. If you have any questions or need further insights, feel free to reach out. Happy mixing!

