Have you ever been in a situation where you’re mastering a track, and it just gets too loud, causing distortion? Or maybe you’ve had to deal with an uneven audio signal that messes up your perfect mix? That’s where a little magic tool called a limiter comes in handy. Let’s discover the secret sauce of mastering engineers – the art of using a limiter.
Key Takeaways
-
A limiter is an essential music production tool that controls audio levels, preventing distortion by ensuring signals don’t go above a set threshold.
-
Properly mastering a limiter’s threshold, attack and release times, and output gain is crucial for maintaining audio dynamics and preventing unwanted distortion or excessive loudness.
-
Limiters are not synonymous with compressors; they’re used for different purposes, such as true peak limiting to prevent digital clipping and multiband limiting for precise frequency control.
Exploring the Basics of a Limiter
In the realm of music production, an audio limiter serves as a reliable ally. It’s an audio processing tool used in the mastering process that prevents your audio signals from crossing a certain threshold. So, you may ask, why would I want to do that? Well, it’s all about maintaining a balanced audio output and preventing your track from getting excessively loud, which can lead to distortion or even damage to your audio equipment.
More intriguingly, a limiter, called brick wall limiters, acts as a brick wall, standing as a protective knight shielding your costly equipment from electrical spikes or extreme volumes, particularly during live broadcasts or recordings.
You might then question the method through which a limiter achieves all these feats. Let’s break it down. A limiter controls the input signal to ensure it doesn’t exceed a certain level. For analog signals, this maximum amplitude is about +24 dBu, while for digital or ‘mixing in the box,’ it’s 0 dBFS (decibels Full Scale). So, when those waveform peaks dare to cross the set limit, our superhero – the limiter, steps in and turns down those peaks, preventing any distortion.
The Core Functions of a Limiter

Having covered the basics, it’s time to delve into the intricate details of a limiter. A limiter is like the boss of sound levels, handling several functions such as:
-
Controlling the threshold
-
Setting the attack time
-
Adjusting the release time
-
Managing the output gain
All of this is done while working with an infinite ratio to prevent audio from exceeding the set limit.
Intrigued? Allow us to dissect it further.
Threshold Mastery
The threshold is where the magic begins in a limiter. It’s like the gatekeeper, deciding when the limiter starts applying dynamic range compression to the audio signal. Picture this: you’re at a concert, and the music is just right, but then the band starts playing their loudest number, and it’s just too much. Now, if you had a limiter’s threshold knob, you could set it to your comfort level, and any music louder than that would automatically be turned down. That’s essentially what a limiter’s threshold does for your audio signal.
However, this gatekeeper can be a bit tricky. If the threshold is set too high or too low, it can cause either too much or too little limiting, thereby messing with the dynamics and the overall average volume of the audio. When it comes to gain reduction, the strategy is to start high on the threshold and then slowly bring it down until you hit around -2 to -3 dB of gain reduction. This way, you get the compression you want without going overboard right from the start.
Remember, lowering the threshold makes the limiter limit more, thus making the output quieter, while raising it allows more signal through, making the output louder.
Attack and Release Nuances
Next up, we have the attack and release controls. Think of these as the speed at which the limiter reacts. The attack control decides how fast the limiter responds to transients and gets to almost full compression, while the release control sets how long it takes for the limiter to let go after the signal goes below the threshold.
Preparing a gourmet dish requires perfect timing, and the same goes for setting the attack and release times on your limiter. The times you set can dramatically change how your limiter sounds. Faster times can make it more intense and loud, while slower times preserve more of the original vibe and might add some smoothness or distortion.
In music production, quicker attack and release times are usually preferred when handling those high-level transients. This helps keep the energy and punch of the music intact, adding that extra spice to your mix.
[showmodule id=”25108195″]
Output Gain Adjustments
Understanding output gain adjustments is like getting the temperature control right in your shower – a delicate balance for the perfect output. The output ceiling control in a limiter is there to make sure the sound doesn’t get distorted, and it’s best to set it between -0.3 dB and -0.8 dB to keep things loud but not clipped.
When it comes to adjusting the input gain, consider the following:
-
Input level and output ceiling
-
Attack and release settings
-
Link control
-
Amount of gain reduction being applied
With the right tweaks, you can enhance the sound quality and avoid any distortion that could mess up the audio signal.
But remember, firstly set your input level and output ceiling, then:
-
Adjust the attack and release parameters for the right timing
-
Handle link control if available
-
Finally, adjust the gain to get the loudness and dynamic control you want.
Limiter vs. Compressor: Identifying the Key Differences
Having delved deeply into the limiter, how does it compare with its close relative – the compressor? If a compressor has a ratio equal to or more than 10:1, it may appear to function similarly to a limiter at first glance. This can be misleading, as the two devices have distinct operational characteristics. But let’s not be hasty in clubbing them together.
While they might seem similar, limiters and compressors have different threshold settings that affect their operation. Limiters are mainly used to stop clipping and make things louder, whereas compressors are more about shaping the dynamic range of a sound. The limiter’s threshold setting sets the max loudness level and stops it from going over, while the compressor’s threshold setting shows when the compression kicks in to lower the sound level. In terms of attack and release controls, a limiter is usually set to react much quicker than a compressor, enabling it to respond faster to loud sound peaks.
Strategic Use of Limiters in Music Production
With a solid understanding of the limiter and its distinction from a compressor, let’s examine its strategic application in music production. A limiter can be your best pal when it comes to mastering and on the master output during live performances. But, it’s not just about slapping it on and hoping for the best.
Like a master chef, you first need to set the right threshold, just below the audio signal’s peaks, and then master the use of knobs like Ceiling, Gain, Attack, and Release.
Finalizing the Master Output
One of the primary uses of a limiter in music production is to:
-
Finalize the master output
-
Even out the sound
-
Prevent it from getting excessively loud and distorted
-
Result in a more balanced and controlled output
Armed with a limiter, the mastering phase becomes a breeze for a mastering engineer.
So how should you set up a limiter for the final master output? Here are some guidelines to follow:
-
Set the limiter’s output gain limit between -0.2 dBFS and -0.02 dBFS.
-
Leave about -6 dB of headroom before using the limiter.
-
Set a ceiling of -0.5 dB.
-
Aim for an average of 16 LUFS for a nice, balanced output.
By using a limiter in this way, you ensure that your recording reaches a good volume for streaming platforms and stays consistent in loudness with other commercial releases.
Managing Dynamic Range in Individual Tracks
While using a limiter on the master output is a common practice, it can also be effectively employed to manage the dynamic range in individual tracks. However, this requires a keen understanding of how to maneuver the limiter settings to prevent any unwanted distortion or loss of dynamics.
When using a limiter on individual tracks, it’s best to avoid clipping, keep the volume below 0dB, and adjust the output gain for proper gain staging. Used correctly, limiters can provide better and quicker results than compression, helping you manage the dynamic range effectively.
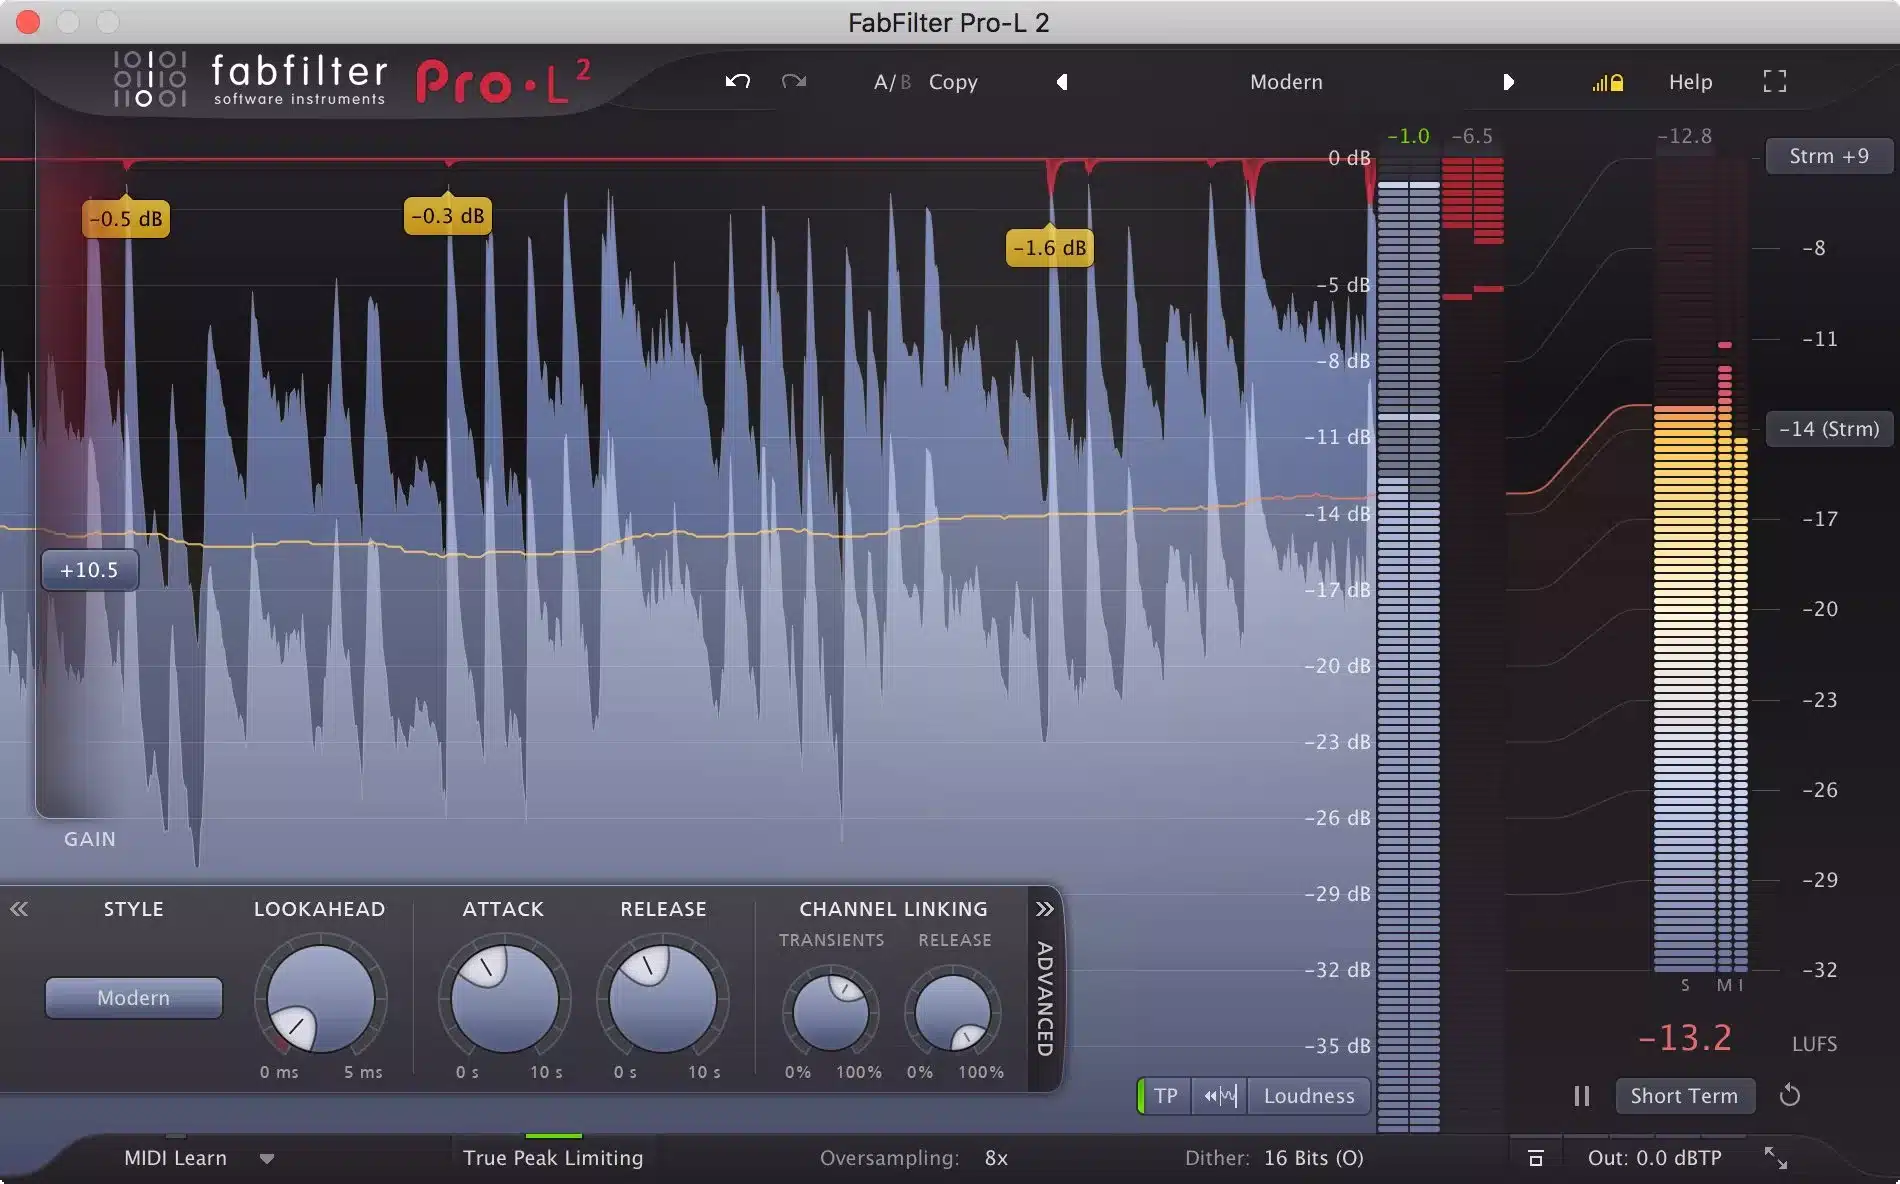
The Art of True Peak Limiting
A comprehensive discourse on limiters wouldn’t be complete without investigating the art of true peak limiting. A true peak limiter is your secret weapon against any sneaky clipping that digital converters might miss. It controls the real level of samples or waveforms to keep the audio clean and free from distortion.
In music production, a true peak limiter is a super strict limiter that uses oversampling to accurately handle and control the peak levels in the audio. This becomes crucial when you need to adhere to specific loudness rules, such as in broadcasting and creating TV commercials.
Multiband Limiting: A Focused Approach
Now, we shift to a more nuanced approach to limiting – multiband limiting. A multiband limiter gives you multiple frequency bands to limit, enabling you to control each part of the mix more precisely. Using a multiband limiter, you can compress specific frequencies more accurately, giving you more control over dynamics without affecting the rest of the audio.
Add to this the cutting-edge technology of IRC IV, which smartly splits up the bands to work better with the music, making the compression sound more natural and clear. Some popular choices for multiband limiters used in music production are:
-
Pro L2
-
Tonebooster’s Barricade
-
TDR Limiter 6
-
L3 multiband limiter
Achieving Transparency with Soft Clipping
[showmodule id=”25108216″]
Soft clipping stands as another critical aspect of limiters. Soft clipping in audio limiters rounds off the peaks of the audio signal to prevent distortion caused by too much gain, offering a type of non-linear behavior.
Utilizing soft clipping in your limiter can help you achieve a more transparent sound. It tones down the sharp sounds while adding extra harmonics for a richer and more transparent sound, adding that extra warmth to your mix. Furthermore, it helps to make the track louder in a more natural way while still keeping the punch and snap in the drums.
Some cool audio limiters featuring soft clipping are Jon V Audio FirComp, K-Clip, Standard Clip, and JST Clip.
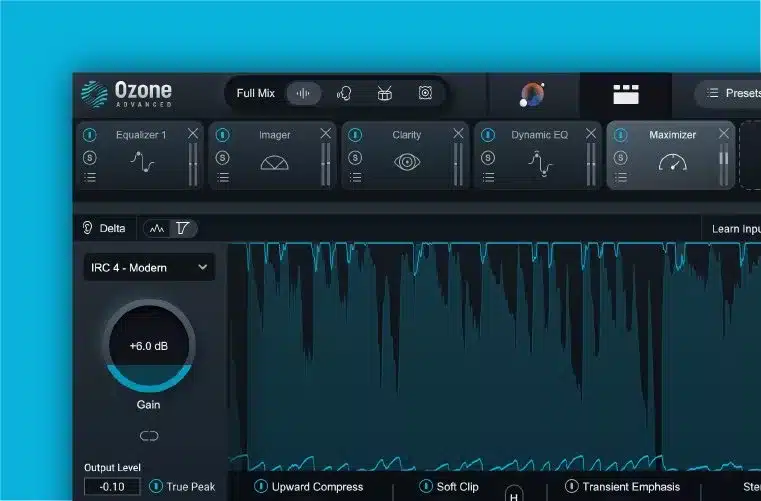
Leveraging the Power of Algorithms in Limiting
Modern limiters offer a range of selectable algorithms that allow musicians and audio engineers to optimize the limiting process according to their specific needs. These algorithms leverage advanced techniques such as multiband technology to create a more transparent and natural effect in the audio.
One notable algorithm used in limiters, especially Izotope’s Ozone 11 is IRC (Intelligent Release Control). IRC algorithms are designed to preserve the dynamics and clarity of the mix, ensuring that the limiting process enhances the music without introducing unwanted artifacts.
An example of an IRC algorithm is IRC IV, which employs psychoacoustic splitting of bands to optimize the limiting process. By analyzing the audio signal across different frequency bands, IRC IV can achieve more precise and effective control over the limiting, resulting in a polished and professional sound.
The choice of algorithm depends on the characteristics of the music being mastered and the desired outcome. Musicians and audio engineers can experiment with different algorithms to find the one that best suits their needs and enhances the overall quality of their mix.
Limiters in Action: Practical Scenarios
Having discussed the theoretical aspects of many limiters, it’s time to witness limiters in action. There are several practical scenarios where limiters can be effectively used in music production, such as:
-
making a track louder without causing distortion
-
controlling the dynamics of instruments or the whole mix
-
avoiding distortion in the master bus
-
making drums and percussion sound more powerful
Preserving Energy in the Entire Mix
One of the most common uses of a limiter is to preserve energy in the entire mix. A limiter helps save energy in a mix by controlling the audio and stopping it from getting too loud, ensuring it stays at the right, volume level while maintaining the dynamics.
To keep the energy in a music mix using a limiter, you can:
-
Set levels higher at the beginning
-
Create the illusion of dynamics
-
Cut out unnecessary low frequencies to keep the mix punchy
-
Control the dynamic ranges by using compression to make the quieter parts louder.
Start working on the next track early and reduce its volume as the first track’s volume declines. Lastly, set the output ceiling slightly below 0 dBFS to maintain the mix’s energy. However, be mindful of potential latency issues, changes in the mix’s vibe, and the extra load it might put on the limiter.
Enhancing Loudness for Commercial Appeal
Another practical scenario where limiters shine is when enhancing loudness for commercial appeal. This is particularly important and effective in genres used for:
-
ads
-
videos
-
social media
-
genres that create a vibe in places like coffee shops, like jazz.
A limiter can help make the mix louder by chopping off the peaks in the mix, thereby increasing the overall loudness of limited signal without causing distortion. To make music sound louder and more appealing for commercial purposes, mastering engineers usually use a mix of:
-
good sample selection
-
well-recorded and processed tracks
-
EQ-ing/filtering
-
dynamic control
Avoiding Common Limiter Pitfalls
Despite their potential as a powerful tool in music production, limiters carry their own set of pitfalls, which can dramatically impinge on your mix’s quality if not averted. Over-limiting or setting the threshold too low can mess up the sound quality of mixing music by causing distortion and affecting the dynamics and overall clarity of the audio.
Similarly, incorrect attack and release settings can mess up the sound by adding distortion, making it sound too intense, and messing with the dynamics. It’s super important to get these settings just right to maintain the desired sound.
Lastly, fiddling too much with the output gain can mess up the phase, make things less clear, and mess up the overall mix. So, it’s best to be careful with the output gain to keep the mix sounding good.
Summary
To wrap up, limiters are a powerful and essential tool in music production. They help maintain a balanced output, control dynamics, avoid distortion, and make the track louder. Understanding how a limiter works, its core functions, and how to effectively use it will greatly enhance your sound production skills. From mastering the threshold, attack, and release nuances to adjusting the output gain, each step plays a crucial role in shaping your sound. Whether it’s preserving energy in the mix, enhancing loudness for commercial appeal, or avoiding common pitfalls, a limiter can be your best friend in the music production process if used correctly.
If you are interested in trying my online mastering services, please feel free to reach out!
Frequently Asked Questions
When should I use a limiter?
You should use a limiter when you want to boost the perceived volume of a sound or restrain unpredictable effects with too much dynamic range. Essentially, you’d be using the limiter as a heavy-duty compressor.
What is the function of a limiter?
A limiter is a crucial tool in the mastering process that allows you to control the loudness of your tracks without distortion. It catches the loudest peaks of an audio source and prevents them from exceeding the clipping point of 0 dBFS.
Should you put a limiter on every track?
It’s not necessary to put a limiter on every track. Instead, add limiters in the final stage of mixing, such as on the mixbus, for better control and balance in the overall sound.
What is the difference between a limiter and a compressor?
Limiters are mainly used to prevent clipping and make things louder, while compressors focus on shaping the dynamic range of a sound. So, limiters help to avoid distortion, while compressors control the range of sound.
How do you use a limiter in music production?
You can use a limiter in music production during mastering or live performances by setting the threshold just below the audio signal’s peaks and adjusting the Ceiling, Gain, Attack, and Release knobs as needed. It’s a helpful tool for controlling the dynamics of your music.
What are brickwall limiters?
Brickwall limiters are a type of limiter that prevents the audio signal from exceeding a predetermined ceiling. They operate with infinitely high ratios and introduce a slight delay in the signal to detect any peaks approaching the threshold. Some limiters have specific modes designed to catch intersample peaks.