3 Ways to Make Your Home Studio Sound Professional (That Don’t Involve Buying New Gear)
Many people believe that buying expensive gear and plugins will give them the tools to create the album of their dreams. We see advertisements everywhere promising that the latest plugin has the most accurate “circuit-to-circuit emulation” of a 60-year-old piece of gear, and think, “This is what my mixes have been missing!”
I’ll admit—I get caught up in the hype too. I have way more compressors than I’ll ever need.
But here’s the truth: the most important piece of gear in your studio isn’t a plugin or a preamp. It’s the room you’re sitting in.
Have you ever thought your song sounded great in your room, but then played it in the car and it fell apart? That’s not your fault—it’s your room lying to you. Frequencies build up or cancel out in untreated spaces, making it tough to hear what’s actually happening.
So without further ado, here are three ways to make your home studio sound more professional—no vintage gear required.
1. Speaker Position: The Easiest Fix With the Biggest Impact
Speaker placement is one of the quickest and cheapest ways to upgrade your monitoring accuracy.
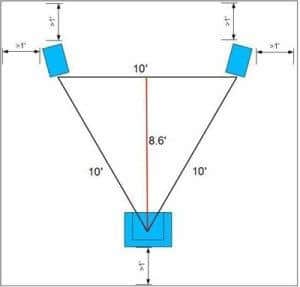
Start by forming an equal triangle between your head and the two monitors. This simple adjustment alone can tighten up your stereo image and make things like panning and reverb placement much easier to judge.
Next, try experimenting with how far your monitors are from the front wall (the wall in front of your face when sitting). Here are three distances to test:
-
Right up against the wall
-
About one foot out
-
38% of the way into the room (from the front wall)
That last one—called the 38% rule—often gives the best low-end balance. But every room is different, so try each position and go with what sounds best to you.
Also, try to keep equal distance from each speaker to the side walls. That way, sound reflections from each wall arrive at your ears at the same time, keeping your stereo field centered and consistent.
2. Acoustic Treatment: Tame the Room, Don’t Soundproof It
When we talk about acoustic treatment, we’re not talking about soundproofing. You’re not trying to block sound from escaping—you’re trying to control how it behaves inside the room.
First: Control Reflections
To tame high and mid frequencies, grab some Owens Corning 703 insulation panels (or pre-made acoustic panels) and wrap them in breathable fabric. Then place them at your room’s first reflection points.
Here’s how to find them:
-
Sit in your normal listening position.
-
Have a friend move a mirror along the wall.
-
Wherever you can see either speaker in the mirror—that’s a reflection point. Mark that spot and hang a panel there.
You’ll want to do this on both side walls and consider doing the same for the ceiling and rear wall.
Second: Trap the Bass
Bass frequencies build up in corners, and that build-up makes it incredibly hard to judge low-end accurately. To solve this, you’ll need bass traps.
You can:
-
Buy them from companies like GIK Acoustics or RealTraps
-
Or DIY them (there are lots of tutorials online)
Install bass traps in all four corners of your room—floor-to-ceiling if possible. This one step can make your mixes go from “boomy and boxy” to “tight and defined.”
3. Use Room EQ Software to Fine-Tune Your Space
Room correction software is a relatively new option, and I’ll be honest—when I first heard about it, I was skeptical.
But after trying Sonarworks SoundID Reference, I was sold.
How It Works:
-
You take measurements of your room using a calibration mic.
-
The software analyzes your frequency response.
-
It then applies a correction curve so your monitors sound more neutral.
Even in my well-treated room, the difference was noticeable. The biggest improvement for me was in the low-end clarityand stereo imaging. It didn’t replace my acoustic treatment—but it definitely enhanced what I already had.
Before using this kind of software, I had a mental note of what was “off” in my room and would compensate while mixing. But with the plugin active, I feel more confident that what I’m hearing is what others will hear too. It’s a huge relief—and honestly, it makes mixing more fun.
Final Thoughts
If your mixes sound off in other environments, you’re not a bad mixer—you’re just not hearing the truth in your space.
Before you drop another $200 on a shiny new plugin, consider:
-
Fine-tuning your speaker placement
-
Adding some DIY or pro acoustic treatment
-
Using room correction software to flatten your monitoring chain
These changes don’t just make your mixes sound better—they make your decisions more accurate. And at the end of the day, better decisions lead to better music.
As always, I hope this helps some of you! Feel free to reach out if you have questions—or if you need your songs mixed or mastered, I’d love to help.
