When you start mastering music, understanding streaming loudness is key. Apple Music, Amazon Music, and Deezer have hi-res streams that play music in its best quality. They also aim for a standard loudness of -14 LUFS, so make sure your tracks are equally loud
The best mastering process uses three main tools: EQ, compression, and a limiter. Start with EQ to balance the tones. Then, use meters to see your adjustments visually and make finer changes. When you get to the limiter, your track should be almost at its final loudness, making finishing touches easier.
If you’re savvy with tech, programs like Logic Pro X have tools for advanced mixing. They help with stereo, mono, and binaural settings, making your music sound great. Volume balance is crucial for an excellent mix. Creative use of compression can really shape how your music feels, making it memorable.
Key Takeaways
- Understand the importance of loudness normalization for streaming platforms.
- Use lossless streaming services like Apple Music and Amazon Music.
- Start your mastering chain with an EQ for proper tonal balance.
- Utilize loudness meters and spectrum analyzers for precise adjustments.
- Incorporate peak limiting toward the end for optimal loudness levels.
Introduction to Mixing and Mastering
In music production, mixing and mastering are key steps. They combine art and tech to create great music. Mastering improves tracks, fixing small issues so they stand out.
A mastering engineer is crucial. They use their experience and special tools to make music sound its best. In the past, mastering meant moving music from one format to another. But today, nearly all music goes online. This change has made distributing music easier but also more complex.
Approach your music with a clear mind for the best results. Experts suggest keeping mastering simple if your mix is already good. This keeps your music real and full of life.
An ideal studio at home needs good tools to handle sound right. Things like monitor isolation and bass trapping are vital. You don’t always need expensive equipment. Studio monitors under $500 can do a great job.
Using mastering tools with multiple modules can help mix and sound. But don’t just use these presets if you’re new. They might take away from your music’s natural sound.
Using EQ right is key. Use narrow cuts early on and wider boosts later. This helps control how your music sounds overall. Also, watch the gain-reduction meters to avoid over-compressing. And, use limiters at the end to make sure your music plays back at the right volume everywhere.
Organizing Your Project Files for a Smooth Workflow
Mastering audio projects requires effective workflow organization. A well-organized file system improves productivity and makes preparing audio projects smoother. Let’s look at key steps to have an organized stems system in your digital audio workstation.
Create a Project Folder
Start by making a folder for each audio project. It’s important to name the project folder clearly for easy finding later. In this folder, keep your digital audio workstation session file. This file acts as a central point for all other project files, making it easy to find and manage them. It’s also good to use SSD drives to store your music files. SSDs make apps run faster and speed up file transfers..
Subfolders for Stems
Use subfolders to organize stems. Arrange them by instrument type, like drums or vocals. This makes it easier to find what you need while mixing. For sample libraries, it’s best to organize them by their name, genre, and type. This detailed system makes the workflow smoother for everyone working on the project.
High-Quality Audio Files
For the best sound quality, always use WAV or AIFF files. Choose a 24-bit depth and a sample rate of 44.1 kHz or more for pristine audio. Keep at least 25% of your SSD empty for top performance and no slow-downs. This way, your digital audio workstation will run effortlessly, improving your workflow’s efficiency and overall quality.
Cleaning Up Your Tracks: Banish Unwanted Noise
Getting perfect audio is all about getting rid of unnecessary sounds. This is key for top-notch audio work. Choosing quiet places to record and using mics that pick up sound only from the front help a lot. Placing mics right and having pop filters make a big difference too.
Utilize Noise Reduction Tools
Noise reduction tools can make your audio sound much better. Sometimes, the sound gets messed up because the tools aren’t used right. Good EQ plug-ins on the master channel can fix this for a cleaner sound. Putting high-pass filters on vocal tracks gets rid of low sounds but keeps the voice sound good. So, a digital console set to block sounds under 100 Hz will get rid of annoying pop noises.
Pro Tips for Reducing Background Noise
Stop background noise by starting with top-notch audio cables to stop signal mixing. Using too many mics can mess with the sound by causing tiny delays. To cut out low-end noise, use HPF filters and subs, making the sound cleaner. And remember, using noise reduction tools the right way keeps the sound pure without losing quality.
The Importance of Appropriate Loudness Standards
Knowing and following the right loudness standards is key in today’s music industry. Each streaming platform has its own rules for keeping all songs playing at the same loudness. For example, Spotify, YouTube, and SoundCloud like to see songs mastered at -14 LUFS, which allows for dynamic sounds. Yet, Apple Music prefers songs at -16 LUFS, just a bit quieter.
In 2022, the music business saw songs mastered around -8 RMS and about -10 LUFS. But, it’s important to remember that streaming sites want songs at -14 LUFS to avoid over-loud sounds that might get turned down. It’s best to avoid mastering too quietly because it might not reach the preferred streaming level.
When it comes to different music styles, loudness needs change. Pop songs, for instance, are often louder at about -8 LUFS. On the other hand, Jazz and Classical music are usually quieter, aiming for -16 LUFS. It’s key to grasp these differences to create great mixes and masters that honor the artist’s intent.
Audio mastering for streaming relies heavily on measuring and managing loudness, especially with LUFS. This affects many parts of the sound, like equalization, distortion, and compression. So, mastering engineers must make sure their work meets each streaming service’s loudness needs. This way, listeners get a great experience no matter where they tune in.
| Streaming Service | Loudness Standard (LUFS) |
|---|---|
| Spotify | -14 |
| Apple Music | -16 |
| SoundCloud | -14 |
| YouTube | -14 |
Using Reference Tracks to Guide Your Mix
Using reference tracks in your audio mixing is like having a treasure map. It helps make your mix match the professional standard. These tracks guide you by showing where the client wants the mix to go. This makes choosing the right sounds and balancing elements easier. It also boosts your listening skills, making mixing quicker and giving you more confidence.
Choosing the Right Reference Tracks
Choosing the right reference tracks is key. Pick songs in the same genre and similar vibe to your project. Always use high-quality file formats to prevent distortions. They help keep the sound clear and true to your work. Using tracks the client provides is important to meet their expectations and goals. Setting up your sound system correctly helps you hear the mix accurately.
How to Use Reference Tracks Effectively
Using reference tracks well takes time and focus. Start by comparing different parts of the music to the reference. This step highlights where your mix needs adjustment. Tools like the Tonal Balance Control can be a big help. They show you how your mix compares to pro standards. Adjusting the EQ to match the reference’s tone also improves your mix.
The goal is to learn from other engineers, not copy them. Understanding what makes a track sound good can enhance your skills. It reduces errors, client corrections, and can even bring more job opportunities. My experience as a sound engineer points to reference tracks as key in reaching top-quality mixes. Everyone from professionals using advanced software to beginners listening closely can benefit from this approach.
Employing Meters for Accurate Readings
Metering tools are key in making music sound great. They check and improve how loud and clear sounds are. By knowing about different meters, you can make sure your music is clear yet balanced. They help your music sound good no matter how it’s played.
Loudness Meters
Being the right loudness is crucial for music on TV or online. Loudness units, measured relative to full scale (LUFS), matter here. True peak meters are also important. They show the very highest points in sound. You need to keep these at certain levels to avoid distortion. This ensures your music sounds perfect to listeners.
Loudness meters also tell you about voice or sound consistency. This info is shown in different ways like moment to moment, short term, and overall. They use tech that works like your ears do. This gives you an idea of how people will hear your music.
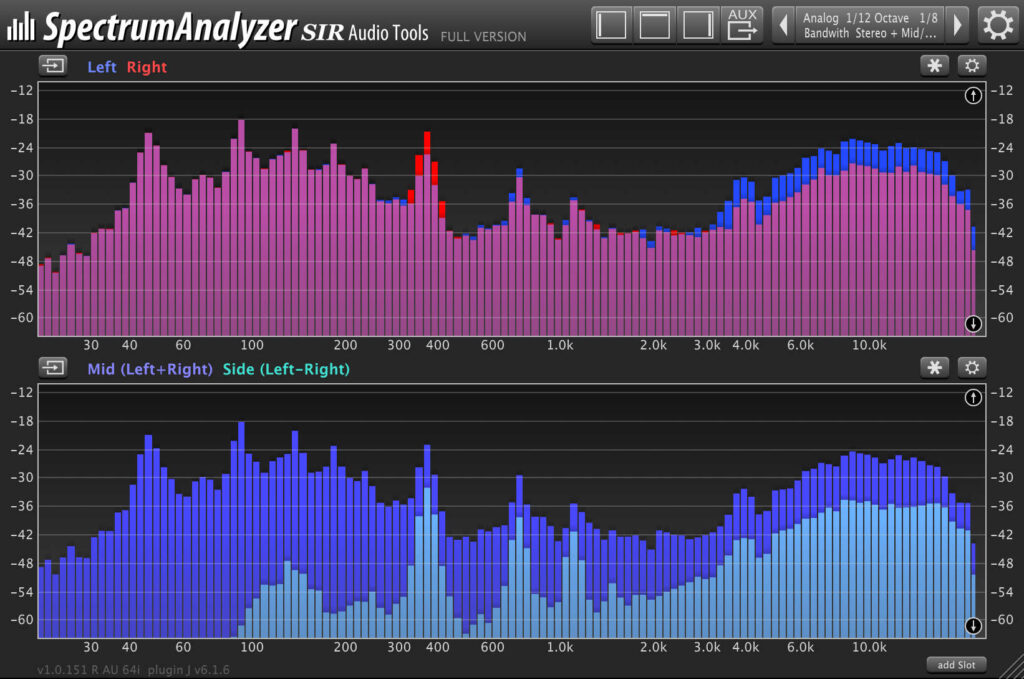
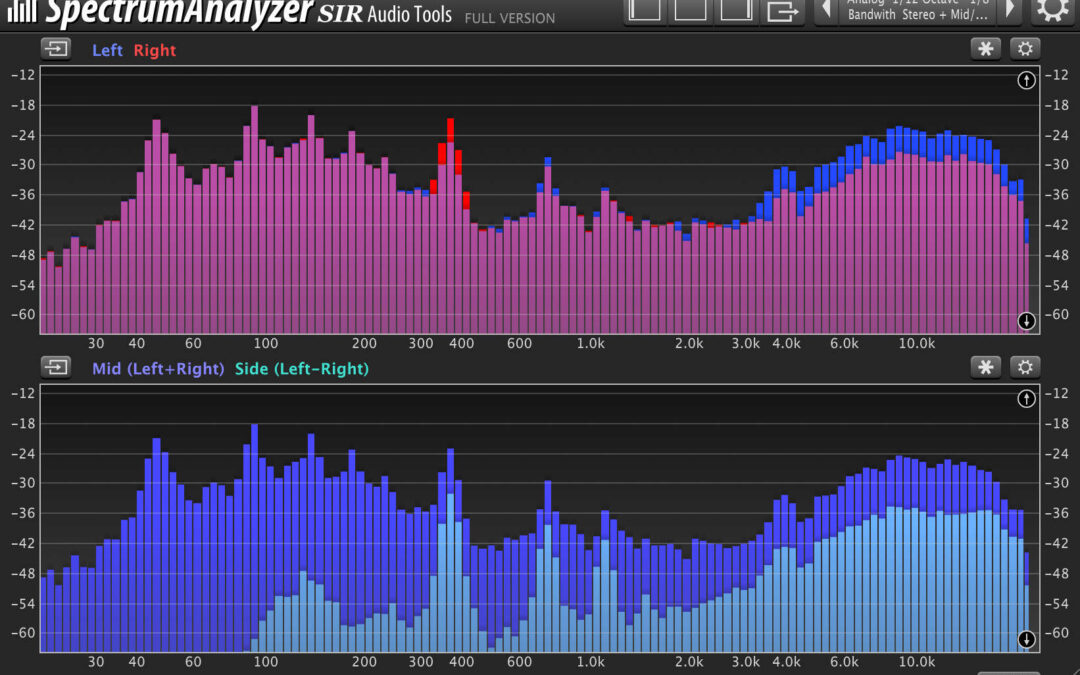
Spectrum Analyzers
Looking at the sound’s frequencies is key too. Spectrum analyzers show the different tones of your music. They help you see if any parts need adjusting. This is key for making sure every part of your music is clear and just right.
Correlation Meters and Vectorscopes
Making music that sounds good everywhere is a challenge. Correlation meters and vectorscopes tackle this. They measure how sounds spread in space and if they match well. Knowing this, you can make sure your music sounds wide yet united. This creates a sound that’s not just balanced, but also pulls you in.
Essential Tools: EQ, Compression, and Limiting
Three key tools make a mastering chain strong: EQ, compression, and peak limiting. EQ adjusts the tonal balance. It shapes the sound quality at the start of the audio chain. Engineers use different EQ methods to make the music sound good everywhere. They might even use tools like RX Pro for Music and RX 10 Standard for audio repair.
Compression is vital for controlling a track’s dynamic range. Suitable for multiband compression in mastering. This means compressing different parts of the sound at various frequencies helps. It ensures the music has the right balance and groove. Methods like mid-side and parallel compression offer more options to improve the track.
Peak limiting marks the end of the audio signal chain. It manages the overall sound level. This step is crucial for a clean, distortion-free final product. Limiters are a strong type of compression. They add the final touch without losing audio quality. The aim is refining the music with these key tools, not overdoing it, for the best outcome.
Using EQ, compression, and limiting well makes a big difference in audio quality. Your music will sound professional and polished. Mastering goes beyond these tools to tasks like adjusting metadata and making quality checks. This ensures your music sounds great on all platforms.
Setting Levels: Why Limiting Comes First
Learning why limiting is key early in mastering helps set the right audio levels. By using limiters, we affect how clear sounds are and how loud they seem. Dynamic range and limiter settings really shape how loud we think music is.
Perceived Loudness and Tonal Balance
Loudness isn’t just about volume. It’s about making sure the sound is well-mixed and clear at every level. Limiters keep sounds from getting too loud but still clear. This makes sure music sounds good everywhere, like on Spotify or Apple Music, where they aim for a certain loudness. This keeps everyone from changing their volume a lot.
Steps for Effective Limiting
Start by setting a limiter with a peak level of -.5 dBFS. Keep your sound and loudness balanced. This is essential to keep your music full of life. Use a tool that shows you how loud your music seems, like LUFS, to match what places like Spotify want. When you listen to your music compared to the original, it’s called A/B testing. This helps you not overdo limiting.
Each music type might need a different limit setup. Rock songs may ask for strong limits to keep their power. But jazz tunes usually do better with gentler limits to save their soft and loud moments. Doing this makes sure your music sounds great wherever it’s played.
FAQ
What is audio mastering and why is it important?
Audio mastering is key in finalizing music. It checks for flaws and makes the sound better. This is so the music sounds good wherever you listen to it.
Which tools are essential for mastering individual tracks?
For mastering, key tools are iZotope’s Ozone 11 and its EQ plugin. Tonal Balance Control is also crucial. These tools ensure your music has the right levels and sound.
Don’t forget loudness meters and spectrum analyzers. They help spot any issues you might miss.
How can I effectively organize my project files for mastering?
To keep your work smooth, set up a project folder. Inside, have subfolders for each type of sound. Add your DAW session file and use high-quality, uncompressed formats.
What are the best practices for reducing unwanted noise in my tracks?
To lower noise, use tools for noise reduction. Also, record in quiet places and point microphones away from noise. Good microphones, pop filters, and cables are vital.
Use noise reduction plugins carefully. They can cut noise without harming sound quality.
What are the loudness standards for different streaming platforms?
Streaming platforms aim for an average loudness of -14 LUFS. Matching your master to this level avoids issues. It keeps your music clear and dynamic.
How should I choose and use reference tracks during mastering?
Pick reference tracks that fit your music’s style. Check their various levels and tones against yours. This will help you make a polished and pro-level track.
What role do meters play in mastering?
Various meters offer insights into your music’s sound. They show loudness, stereo width, and more. Using them ensures your music is well-balanced and ready for any system.
What are the core tools in a mastering chain?
Mastering chains need EQ, compression, and limiters. They help balance sound and control dynamics. These tools are fundamental in making your music sound good.
Why is perceived loudness important and how is it influenced?
Perceived loudness ties to how well your music is balanced. Setting levels right early on avoids problems. This approach maintains your music’s quality and tone beautifully.