Introduction:
When it comes to music production, the right plugins can make a world of difference. As a mix and mastering engineer, I’ve tested countless plugins over the years, but not all of them end up becoming part of my everyday workflow. In 2024, a few standout plugins have proven themselves to be essential tools for enhancing my mixes and delivering professional results. Whether you’re a seasoned pro or just starting out, these plugins can help take your music to the next level by adding clarity, warmth, and depth.
In this blog, I’ll walk you through my top 5 favorite plugins of 2024, explaining what makes them special and how I use them in my daily projects. From dynamic EQs to colorful compressors and versatile mixing tools, these plugins aren’t just great—they’re game-changers. Let’s dive in!
Neutron 5 by iZotope
Why It’s Great:
Neutron 5 has been a game-changer for mixing engineers, and the 2024 version brings even more to the table. (Full Review) One of the standout additions is the new Density Module, which offers upward compression. Unlike traditional compression that merely tames loud peaks, this feature enhances quieter elements, adding density and cohesion to your mix without flattening dynamics. This is why it earned a spot on my top 5 list—it’s a subtle but powerful tool for bringing instruments to life.
Key Features:
- Density Module: Increases perceived loudness by lifting quiet parts rather than suppressing peaks.
- Dynamic Processing: Ideal for creating a polished, professional sound.
- Versatility: Works across various instruments and genres, making it a go-to for any mix.
How I Use It:
I typically use Neutron 5 when I’m about 80% done with a mix and there’s an instrument that feels lost in the arrangement. It’s especially useful for enhancing percussive elements or synths that need more presence. For example, when I applied it to a pluck sound in one of my recent mixes, it helped bring out the reverb tails and subtle nuances, making the part sit better in the overall mix. I’ve also found it incredibly effective on percussion loops where some elements aren’t cutting through as much as I’d like.
Pro Tip:
Use Neutron 5’s Density Module to subtly lift quiet nuances in complex instruments without over-compressing. It’s particularly helpful when you want to preserve the natural dynamics of an instrument while making it more prominent in the mix.
Michael Brauer Green Compressor
Why It’s Great:
The Michael Brauer Green Compressor isn’t your average, transparent compressor—it’s bold, colorful, and full of character. Designed to add warmth and richness to any audio signal, this plugin excels at enhancing bass tracks and bringing a distinct vibe to your mix. What sets it apart is its ability to add saturation and thickness without crushing the dynamics, making it perfect for bass-heavy mixes or tracks that need extra weight.
Key Features:
- Colorful Compression: Adds harmonic richness and subtle saturation.
- Wet/Dry Mix Control: Ideal for parallel compression, allowing you to blend the processed signal with the original for a more natural sound.
- Saturation & Warmth Controls: Fine-tune the tone by dialing in warmth or grit as needed.
How I Use It:
I primarily use this plugin on bass tracks, where it truly shines. Whether I’m working with electric bass, synth bass, or acoustic bass, the Michael Brauer Green Compressor adds a thickness that helps the bass sit perfectly in the mix. Sometimes, I apply a bit of parallel compression using the wet/dry knob to retain the original dynamics while adding just enough grit and saturation to make the bass pop.
For example, in a recent mix, I had a bass track that lacked punch. By applying light compression and some warmth, the track immediately gained more presence and glued better with the drums. The result? A bass sound that was both full and controlled without overpowering the mix.
Pro Tip:
If you feel the plugin is coloring the tone too much, use the wet/dry mix knob to blend the compressed signal with the original. This way, you can maintain the plugin’s thickness and vibe while keeping the original tone intact. Also, experiment with the saturation control to add subtle grit, especially on rock or funk basslines.
Orion by Cradle Audio & Jaycen Joshua
Why It’s Great:
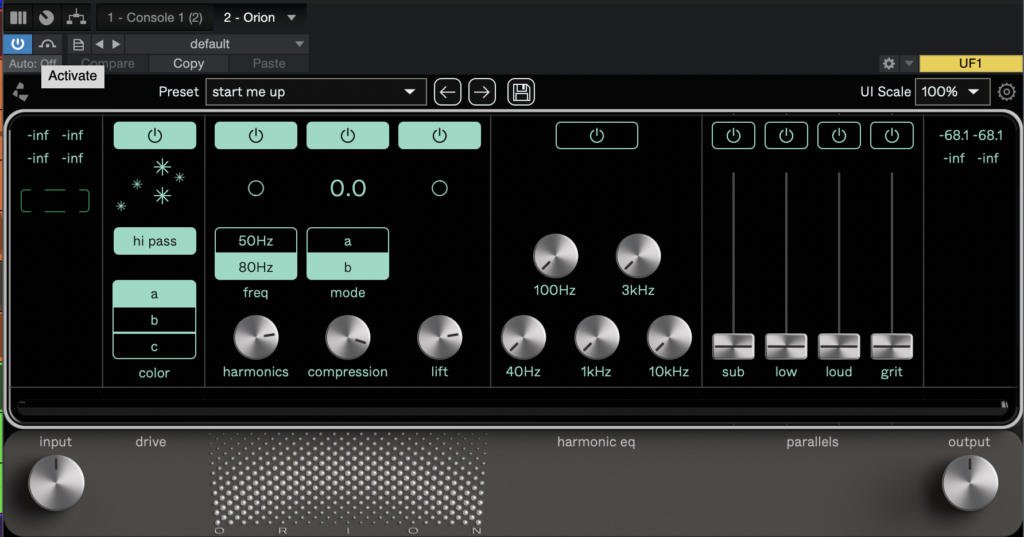
Designed in collaboration with renowned mix engineer Jaycen Joshua, Orion by Cradle Audio (see full review here) is a powerhouse plugin that combines multiple mixing tools into a single intuitive interface. It replicates the iconic sound Jason has been using for years on his drum buses, blending the warmth of analog saturation with the punch of dynamic processing. What makes Orion special is its ability to shape drums in a way that adds both weight and clarity without muddying the mix.
Key Features:
- Analog Saturation & EQ: Modeled after legendary hardware units, giving your drums an analog vibe.
- Parallel Processing Channels: Offers dedicated controls for sub, grit, loudness, and tonal enhancement.
- Customizable Signal Chain: You can disable or rearrange sections to fit your specific mix needs.
How I Use It:
I primarily use Orion on drum buses, where it brings a unique combination of punch and warmth. Its parallel channels—Sub, Loud, Grit, and Tone—are incredibly handy for fine-tuning the drum sound. For instance, when I need more low-end punch, I dial up the Sub channel. If the drums need extra bite to cut through the mix, a touch of Grit adds just the right amount of high-end distortion.
One of my go-to techniques with Orion is to disable the NLS bus section, which can sometimes change the tone too much for my liking. Instead, I focus on the saturation and parallel channels, blending them subtly to retain the natural feel of the drums while adding extra power and definition.
Pro Tip:
For level matching, I ecommend setting the Output Trim to around -5 dB, which keeps the processed drums at the same perceived loudness as the unprocessed signal. Also, don’t be afraid to use the parallel channels creatively—try applying the Sub channel not just on drums, but also on bass or synths to add low-end presence.
Pro Q4 by FabFilter
Why It’s Great:
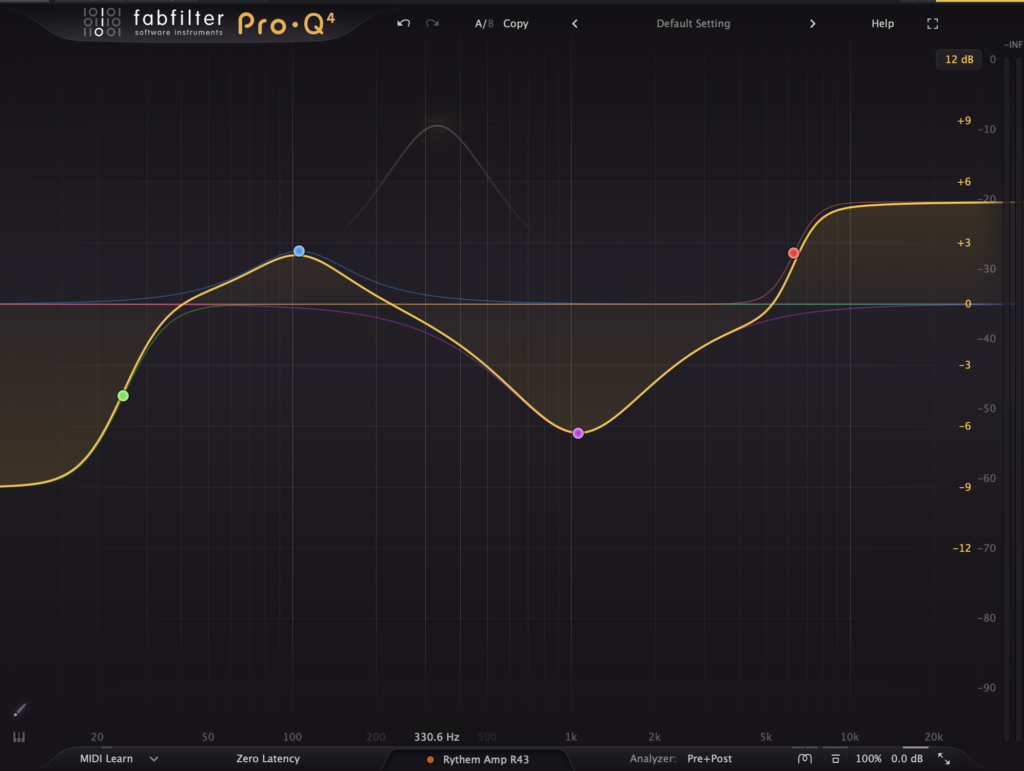
FabFilter’s Pro Q series has long been a staple in the world of mixing and mastering, and the new Pro Q4 takes things to the next level. ( Full review here) While it retains the precision and transparency that made its predecessors so popular, the latest update introduces a game-changing feature: Spectral Dynamics Mode. This new functionality allows for dynamic resonance control across a broader frequency range, making it easier than ever to tame harsh frequencies and improve the tonal balance of a track.
Key Features:
- Spectral Dynamics Mode: Dynamically adjusts resonant frequencies, ensuring smooth and balanced sound.
- Surgical Precision: With up to 24 bands and the ability to adjust frequency, gain, and bandwidth in real-time.
- User-Friendly Interface: Intuitive controls and real-time spectrum analysis make it easy to spot problem areas.
How I Use It:
One of my favorite uses for Pro Q4 is on vocals. Previously, I would manually identify harsh resonant frequencies and apply dynamic EQ to control them. With the Spectral Dynamics Mode, Pro Q4 now does this more efficiently by automatically tracking and dynamically reducing resonances as they shift over time.
For example, when working on a vocal track with noticeable sibilance and harsh peaks, I activated the Spectral Dynamics Mode, set a few key bands, and let the plugin handle the rest. It not only removed the harshness but also preserved the natural dynamics of the performance, resulting in a clearer and more polished vocal.
Pro Tip:
To get the best results with Spectral Dynamics Mode, start by identifying the harsh frequencies using the real-time spectrum analyzer. Once identified, switch those bands to Dynamic Mode and adjust the range and threshold to ensure natural-sounding control without over-processing. This technique works wonders not only on vocals but also on instruments like guitars, pianos, and even full mixes.
Console One MK3 by Softube
Why It’s Great:
The Console One MK3 by Softube offers a unique blend of hardware and software integration, giving you the tactile feel of a physical mixing console with the flexibility of digital audio processing. The 2024 update makes it even more versatile by allowing full functionality without the need for the physical controller, meaning you can now use it on the go with just your laptop. Whether you’re in the studio or working remotely, Console One MK3 provides all the essential tools you need for efficient, high-quality mixing.
Key Features:
- Complete Channel Strip: Includes filters, EQ, compression, and drive—all modeled after iconic analog hardware.
- Standalone Software Mode: Now you can mix anywhere without needing the physical Console One controller.
- Integrated Workflow: Seamlessly integrates with major DAWs, allowing for quick access to all mixing parameters.
- Preset Flexibility: Easily save and recall channel strip presets for consistent sound across multiple projects.
How I Use It:
I rely on Console One MK3 in virtually every mix I do. It’s my go-to for setting up initial channel strips, where I can quickly apply EQ, compression, and filtering. When I’m away from the studio, the new standalone software mode allows me to start mixes on my laptop, then finalize them later using the physical controller when I’m back in the studio. This flexibility has been a game-changer for my workflow.
For example, I often start by using light EQ and filters on vocals or instruments during the early stages of a mix. Once I return to my main setup, I can fine-tune everything with the tactile controls of the hardware unit, ensuring that every element of the mix sounds just right.
Pro Tip:
Use Console One’s built-in Drive and Character controls to add subtle analog warmth to your tracks. For vocals, boosting the drive slightly can add a pleasing harmonic richness, while the character knob allows you to fine-tune the tone. Additionally, setting up a few go-to presets for different instruments can save a lot of time and help maintain consistency across mixes.
Conclusion
Plugins are the backbone of any modern mixing and mastering workflow, and finding the right ones can make a significant difference in the quality of your final product. Each of the plugins on this list has earned its place in my daily toolkit for 2024, offering unique features that enhance creativity, improve efficiency, and deliver professional results.
Whether it’s the dynamic control of Neutron 5, the analog warmth of the Michael Brauer Green Compressor, the punchy drum shaping of Orion, the surgical precision of Pro Q4, or the versatile, hands-on workflow of Console One MK3, these tools have consistently helped me achieve better mixes faster. They’re not just plugins—they’re essential components of my sound.
If you’re looking to step up your mixing game, I highly recommend giving these plugins a try. And if you’re already using them, I’d love to hear how they’ve worked for you—drop a comment below and let me know your thoughts!
Finally, if you need help with your mixes or want to learn more about mixing and mastering, check out my courses, presets, or professional mixing services at mixandmastermysong.com. Here’s to making great music in 2024!


