Understanding the Role of Reverb in a Mix
Reverb does more than just make things sound “big.” It shapes the emotional landscape of a track. Whether you’re working on a stripped-back acoustic ballad or a tightly produced trap record, reverb can either glue the mix together or pull it apart if misused.
One of the first things I like to think about when dialing in reverb is space. Not in the sci-fi sense, but in terms of how I want the listener to feel. Do I want the vocal to sound like it was recorded in a small, intimate room? Or do I want it to feel like it’s floating in a massive cathedral? That decision informs the type of reverb I’ll reach for—plate, hall, room, chamber, or even a combination.
But the space is only half the equation. The other half is rhythm. This is where tempo-based reverb comes in. By syncing the reverb’s timing—specifically the pre-delay and decay—to the BPM of the track, you get something that feels more musical and intentional. It breathes with the song instead of smearing across it.
That’s what we’re diving into in this post. I’ll walk you through how to choose the right reverb type, calculate the right delay times based on your tempo, and show you how to dial it in so it feels right—whether you’re mixing vocals, drums, or synths.
The Concept Behind Tempo-Based Reverb
At its core, tempo-based reverb is all about rhythmically aligning the reflections in your mix with the groove of the track. It’s a subtle technique—but when it’s dialed in, it can make a big difference in how tight, clean, and professional your mix sounds.
Let’s break it down: every reverb has a pre-delay and a decay (or reverb time). Pre-delay is the time between the dry sound and when the reverb kicks in. Decay is how long the reverb lasts. When those timings are set arbitrarily, your reverb can wash over important moments—like a vocal phrase or snare hit—and blur the definition of the mix.
But when those values are locked to your song’s BPM? That’s when the magic happens.
Instead of muddying things up, the reverb actually grooves with the music. It creates a sense of cohesion—especially in genres like hip hop, pop, or electronic music where rhythmic precision is everything. For example, setting a pre-delay to an eighth note allows a vocal to punch through clearly, while the reverb waits just a beat before tailing off. It feels clean and intentional.
This kind of syncing doesn’t just sound better—it feels better too. It brings a subtle movement and momentum to the mix that you’d miss if you were dialing in decay times blindly.
Tools You’ll Need: BPM Detection + Delay Time Calculator
To set up a tempo-based reverb properly, you’ll need two things: your song’s BPM and a way to convert musical note values into milliseconds. Luckily, most DAWs will give you the tempo upfront, especially if you’re working from a grid or programmed beat. But if you’re working with live recordings or stems and don’t have the BPM, you’ll want to tap it out using your DAW’s tempo tap function or use a site like TuneBat to detect it.
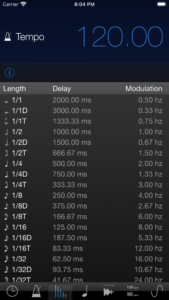
Once you’ve got your tempo, you’ll need to translate note values—like an eighth note or a quarter note—into milliseconds so you can set the pre-delay and reverb time accurately. I use an app called MusicMath, which is available for iOS, but there are plenty of free browser-based alternatives too. Just type in your BPM and it’ll give you the timing for common note divisions.
Here’s a quick reference for a track at 120 BPM:
-
1/64 note = ~31 ms
-
1/32 note = ~62 ms
-
1/16 note = ~125 ms
-
1/8 note = ~250 ms
-
1/4 note = ~500 ms
-
1/2 note = ~1000 ms
-
Whole note = ~2000 ms
For pre-delay, I tend to go short—32nd or 64th notes—unless I’m intentionally going for that delay-before-the-wash effect (which I’ll cover in the next section). For reverb time, I like to start with a quarter note and work my way up, depending on how dense or open the arrangement is.
This step doesn’t take long once you get the hang of it, and it makes a world of difference. Instead of guessing, you’re making musical choices that enhance the groove.
Practical Application: Setting Pre-Delay and Reverb Time
Once you’ve picked your reverb type and calculated the right timings, it’s time to actually dial it in. For me, this is where things start to come alive in the mix.
Let’s say you’re working on a lead vocal. I’ll start by creating an aux track, loading up a reverb plugin, and setting the pre-delay to something short—usually a 1/32 or 1/64 note. This short delay gives the dry vocal a little breathing room before the reverb kicks in, which keeps it upfront and present. It’s especially useful in busy arrangements where you want clarity.
Now here’s a trick I use all the time: set the pre-delay to an 1/8 note. That’s long enough for the vocal to punch through clearly, but then the reverb comes in just after, creating this lush sense of space without stepping on the performance. It’s a subtle move, but it helps vocals sit naturally in the track rather than floating on top of it.
For the reverb time (or decay), I tend to start with a quarter or half note. On slower songs, sometimes even a whole note. If the tempo is fast and the arrangement dense, I’ll back it off so things don’t get muddy. The goal is to keep the groove intact while still adding the vibe and emotion that reverb brings.
And don’t be afraid to experiment. Try automating the decay time in different sections of the song, or layering multiple reverbs with different timing values to add complexity. I’ve had great results using a short plate with a tight pre-delay, paired with a longer hall tucked in behind it.
The point is: once you start thinking of reverb in musical terms—locked to the grid—you can shape space in a way that enhances the rhythm, not just the tone.
Creative Variations and When to Break the Rules
Tempo-based reverb is a solid foundation, but once you understand the rules, you can start bending them to serve the song.
One approach I use often is offsetting the reverb just slightly off the grid. For instance, maybe I’ll set the decay a bit longer than a full note or go with a dotted eighth pre-delay instead of a straight value. This creates a push-and-pull tension that gives the mix more movement—especially on atmospheric vocals or ambient guitar parts.
Another trick is stacking reverbs with different timing values. You could have a short room reverb locked to a 1/16 note to give immediacy, and then layer a hall with a longer, less synced tail that floats in the background. It adds complexity without crowding the mix—if you balance it right.
Automation is your friend here too. I sometimes automate the reverb time in choruses to be longer than in verses. It’s subtle, but it opens up the energy without having to change much else in the mix.
Bottom line: tempo-based reverb is a tool, not a rulebook. Let the groove guide you, but always trust your ears. If breaking the grid sounds better, go with it.
Conclusion: Make Your Reverb Work With the Song, Not Against It
Reverb can make or break a mix. When used thoughtfully—especially in time with your track’s tempo—it becomes a powerful musical tool that enhances space, depth, and rhythm.
By syncing your pre-delay and decay times to the BPM, you create a more intentional and polished sound. Whether it’s a tight eighth-note pre-delay on a lead vocal or a long hall that breathes with the chorus, these choices help your mix feel more finished.
If you’re new to tempo-based reverb, start small. Use a calculator, experiment with a few note values, and listen closely to how it affects the pocket. Before long, you’ll start to hear your mixes come to life in a more connected, rhythmic way.
And if you’re stuck or just want to hear how this works in action, check out the video below where I walk through my exact reverb setup step by step.
[author] [author_image timthumb=’on’]https://mixandmastermysong.com/wp-content/uploads/Matt-profile-pic-.jpg[/author_image] [author_info]Matty Harris is a professional mixing and mastering engineer based in Los Angeles with over 15 years of experience. He’s worked with major artists like Kelly Clarkson and Travis Barker, and has helped thousands of independent musicians take their songs to a professional level. When he’s not in the studio or creating content for his 40K+ YouTube followers, he’s helping artists around the world elevate their sound through his online mixing and mastering services. [Learn more here.](https://mixandmastermysong.com/)[/author_info] [/author]
I’m very interested in learning more about your site.